**这是本文档旧的修订版!**
串行接口RS-232
串口UART是PC和FPGA通信的最简单的方式,它是一种异步串行/全双工的通信方式,尤其是目前的PC都是通过USB端口来进行UART数据的传输,可以实现更高的传输速率,比如1.5Mbps。
异步通信
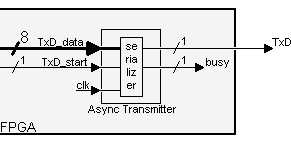
异步发送
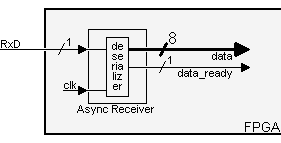
异步接收
RS-232的串行接口是如何工作的?
一个RS-232接口有如下的特性:
- 使用9针的连接器“DB-9” (更老的PCs使用25管脚的“DB-25”),现在都在使用USB-UART的接口方式
- 允许双向全双工通信(PC可以同时接收、发送数据).
- 最高的通信速率可以达到10KBytes/s.
- DB-9连接器
- 管脚2: RxD(接收数据).
- 管脚3: TxD(发送数据).
- 管脚5: GND(地).
只需要3根线,就可以进行数据的收、发。
数据通常以多个8位(我们称之为一个Byte)来进行发送,先将其进行串行化:低位(数据的bit 0)先发送,接着是bit 1, … 最后是最高位的bit 7。
异步通信:
此接口采用异步协议,也就是没有时钟信号与数据一起发送,接收端必须能够对接收到的数据自行进行“定时”提取和判决。
RS-232是这样处理的:
- 收、发两端采用事先约定好的同样的通信参数(速率、格式。。。),这要在通信之前手动设定
- 只要是线路闲置,发送端就发出“idle” (=“1”)
- 每一次要发送一个字节的数据,发送端都要先发一个“start” (=“0”),这样接收端就可以判别出有一个字节要来了
- 然后发送一个字节的8个位
- 每发完一个字节以后发送端就发“stop” (=“1”)
我们以0x55来看看是如何发送的
一个字节0x55的数值用二进制表示就是01010101,由于先发送最低位(bit-0),线路的变化为: 1-0-1-0-1-0-1-0.
传输的数据为0xC4,能不能看出来?
这些位数很难看出来,可以看出,让接收端知道数据的发送速率是非常重要的。
数据发送能够多块?
发送的速度是以波特(每秒都少个位)来标称的,例如1000波特意味着每秒1000位,或者说每一位持续时间为1毫秒
RS-232接口的传输速率不是任意的,它有一些固定的值:
- 1200 bauds.
- 9600 bauds.
- 38400 bauds.
- 115200 bauds (一般来讲这是能用到的最快的速率).
如果传输速率为115200波特,每一位持续时间为(1/115200) = 8.7µs. 如果你要传输8位一个字节的数据,持续时间为8 x 8.7µs = 69µs.但每一个字节还需要额外的开始、停止位,所以你实际需要10 x 8.7µs = 87µs的时间,也就是最大的传输速率为每秒11.5K字节。
物理层
在传输的导线上,信号采用正/负电压的机制:
- “1” 使用-10V来发送 (或介于-5V到-15V之间).
- “0” 使用+10V来发送 (或介于5V到15V之间).
串行接口的Verilog实现
这里我们用115200波特率,FPGA一般运行在更高的频率,远高于115200Hz,我们需要用FPGA的时钟产生每秒115200个脉冲。
传统上RS-232芯片采用1.8432MHz的时钟,可以通过/16分频轻松的到115200Hz以及其它波特率的频率。
// 假设FPGA的时钟为1.8432MHz
// 我们创建一个4位的计数器
reg [3:0] BaudDivCnt;
always @(posedge clk) BaudDivCnt <= BaudDivCnt + 1; // 从0到15计数

// 每16个时钟就会产生一个脉冲信号(每秒115200个脉冲信号)
wire BaudTick = (BaudDivCnt==15);
如果时钟不是1.8432MHz,比如2MHz,为产生115200MHz的频率需要分频17.361111111,不是一个整数,解决的方法为时而/17,时而/18,以确保最后得到的平均数为17.361111111,串行接口能够容忍波特率一定的误差范围 - 此方式类似于DDS中任意频率的生成机制。
// 假设FPGA的时钟为2.0000MHz
// 使用10位的累加器再附加额外的位用于累加器的进位,总计11位
reg [10:0] acc;   // 总计11位

// 每一个时钟累加器增加59
always @(posedge clk)
  acc <= acc[9:0] + 59; // use 10 bits from the previous accumulator result, but save the full 11 bits result

wire BaudTick = acc[10]; // 用最高位作为波特率的时钟输出
在2MHz的情况下, “BaudTick”每秒钟变动115234次,与115200的误差为0.03%。
参数化的FPGA波特率发生器
下面的设计为25MHz的系统时钟,使用一个16位的累加器,代码可以通过调节参数灵活定制
parameter ClkFrequency = 25000000; // 25MHz
parameter Baud = 115200;
parameter BaudGeneratorAccWidth = 16;
parameter BaudGeneratorInc = (Baud<<BaudGeneratorAccWidth)/ClkFrequency;

reg [BaudGeneratorAccWidth:0] BaudGeneratorAcc;
always @(posedge clk)
  BaudGeneratorAcc <= BaudGeneratorAcc[BaudGeneratorAccWidth-1:0] + BaudGeneratorInc;

wire BaudTick = BaudGeneratorAcc[BaudGeneratorAccWidth];
如果系统时钟为12MHz,波特率115200Hz,波特率步进量为629,误差为0.02%
由于计算出来的BaudGeneratorInc结果超出了32位的中间结果,需要做一些调整:
parameter BaudGeneratorInc = ((Baud<<(BaudGeneratorAccWidth-4))+(ClkFrequency>>5))/(ClkFrequency>>4);
RS-232 发送
异步发送的固定参数:8个数据位,2个停止位,无奇偶校验。
发送端获取8位的数据,将其串行化(当Txdstart信号被断言的时候),当传输发生的时候“busy”信号会被断言,在此期间“TxDstart”信号被忽略。
采用状态机进行发送比较合适:
reg [3:0] state;

// the state machine starts when "TxD_start" is asserted, but advances when "BaudTick" is asserted (115200 times a second)
always @(posedge clk)
case(state)
  4'b0000: if(TxD_start) state <= 4'b0100;
  4'b0100: if(BaudTick) state <= 4'b1000; // start
  4'b1000: if(BaudTick) state <= 4'b1001; // bit 0
  4'b1001: if(BaudTick) state <= 4'b1010; // bit 1
  4'b1010: if(BaudTick) state <= 4'b1011; // bit 2
  4'b1011: if(BaudTick) state <= 4'b1100; // bit 3
  4'b1100: if(BaudTick) state <= 4'b1101; // bit 4
  4'b1101: if(BaudTick) state <= 4'b1110; // bit 5
  4'b1110: if(BaudTick) state <= 4'b1111; // bit 6
  4'b1111: if(BaudTick) state <= 4'b0001; // bit 7
  4'b0001: if(BaudTick) state <= 4'b0010; // stop1
  4'b0010: if(BaudTick) state <= 4'b0000; // stop2
  default: if(BaudTick) state <= 4'b0000;
endcase
现在,我们只需要产生“TxD”输出。
reg muxbit;

always @(state[2:0])
case(state[2:0])
  0: muxbit <= TxD_data[0];
  1: muxbit <= TxD_data[1];
  2: muxbit <= TxD_data[2];
  3: muxbit <= TxD_data[3];
  4: muxbit <= TxD_data[4];
  5: muxbit <= TxD_data[5];
  6: muxbit <= TxD_data[6];
  7: muxbit <= TxD_data[7];
endcase

//将起始位、数据位、停止位结合在一起
assign TxD = (state<4) | (state[3] & muxbit);
下面是完整的代码:
Serial interface 4 - RS-232 receiver
We are building an “async receiver”: Our implementation works like that:
The module assembles data from the RxD line as it comes. As a byte is being received, it appears on the “data” bus. Once a complete byte has been received, “dataready” is asserted for one clock. Note that “data” is valid only when “dataready” is asserted. The rest of the time, don't use it as new data may come that shuffles it.
Oversampling An asynchronous receiver has to somehow get in-sync with the incoming signal (it normally doesn't have access to the clock used by the transmitter).
To determine when a new data byte is coming, we look for the “start” bit by oversampling the signal at a multiple of the baud rate frequency. Once the “start” bit is detected, we sample the line at the known baud rate to acquire the data bits. Receivers typically oversample the incoming signal at 16 times the baud rate. We use 8 times here… For 115200 bauds, that gives a sampling rate of 921600Hz.
Let's assume that we have a “Baud8Tick” signal available, asserted 921600 times a second.
The design First, the incoming “RxD” signal has no relationship with our clock. We use two D flip-flops to oversample it, and synchronize it to our clock domain.
reg [1:0] RxD_sync;
always @(posedge clk) if(Baud8Tick) RxD_sync <= {RxD_sync[0], RxD};
We filter the data, so that short spikes on the RxD line aren't mistaken with start bits.
reg [1:0] RxD_cnt;
reg RxD_bit;

always @(posedge clk)
if(Baud8Tick)
begin
  if(RxD_sync[1] && RxD_cnt!=2'b11) RxD_cnt <= RxD_cnt + 1;
  else
  if(~RxD_sync[1] && RxD_cnt!=2'b00) RxD_cnt <= RxD_cnt - 1;

  if(RxD_cnt==2'b00) RxD_bit <= 0;
  else
  if(RxD_cnt==2'b11) RxD_bit <= 1;
end
A state machine allows us to go through each bit received, once a “start” is detected.
reg [3:0] state;

always @(posedge clk)
if(Baud8Tick)
case(state)
  4'b0000: if(~RxD_bit) state <= 4'b1000; // start bit found?
  4'b1000: if(next_bit) state <= 4'b1001; // bit 0
  4'b1001: if(next_bit) state <= 4'b1010; // bit 1
  4'b1010: if(next_bit) state <= 4'b1011; // bit 2
  4'b1011: if(next_bit) state <= 4'b1100; // bit 3
  4'b1100: if(next_bit) state <= 4'b1101; // bit 4
  4'b1101: if(next_bit) state <= 4'b1110; // bit 5
  4'b1110: if(next_bit) state <= 4'b1111; // bit 6
  4'b1111: if(next_bit) state <= 4'b0001; // bit 7
  4'b0001: if(next_bit) state <= 4'b0000; // stop bit
  default: state <= 4'b0000;
endcase
Notice that we used a “next_bit” signal, to go from bit to bit.
reg [2:0] bit_spacing;

always @(posedge clk)
if(state==0)
  bit_spacing <= 0;
else
if(Baud8Tick)
  bit_spacing <= bit_spacing + 1;

wire next_bit = (bit_spacing==7);
Finally a shift register collects the data bits as they come.
reg [7:0] RxD_data;
always @(posedge clk) if(Baud8Tick && next_bit && state[3]) RxD_data <= {RxD_bit, RxD_data[7:1]};
The complete code can be found here. It has a few improvements; follow the comments in the code.
Links More details on Asynchronous Communication
Serial interface 5 - How to use the RS-232 transmitter and receiver This design allows controlling a few FPGA pins from your PC (through your PC's serial port).
It create 8 outputs on the FPGA (port named “GPout”). GPout is updated by any character that the FPGA receives. Also 8 inputs on the FPGA (port named “GPin”). GPin is transmitted every time the FPGA receives a character. The GP outputs can be used to control anything remotely from your PC, might be LEDs or a coffee machine…
module serialGPIO(
    input clk,
    input RxD,
    output TxD,

    output reg [7:0] GPout,  // general purpose outputs
    input [7:0] GPin  // general purpose inputs
);

wire RxD_data_ready;
wire [7:0] RxD_data;
async_receiver RX(.clk(clk), .RxD(RxD), .RxD_data_ready(RxD_data_ready), .RxD_data(RxD_data));
always @(posedge clk) if(RxD_data_ready) GPout <= RxD_data;

async_transmitter TX(.clk(clk), .TxD(TxD), .TxD_start(RxD_data_ready), .TxD_data(GPin));
endmodule
Remember to grab the asyncreceiver and asynctransmitter modules here, and to update the clock frequency values inside.


