差别
这里会显示出您选择的修订版和当前版本之间的差别。
| 两侧同时换到之前的修订记录 前一修订版 后一修订版 | 前一修订版 | ||
|
heartratemonitors [2023/07/24 10:45] wangzihao |
heartratemonitors [2023/07/26 17:55] (当前版本) wangzihao [5. 参考案例] |
||
|---|---|---|---|
| 行 35: | 行 35: | ||
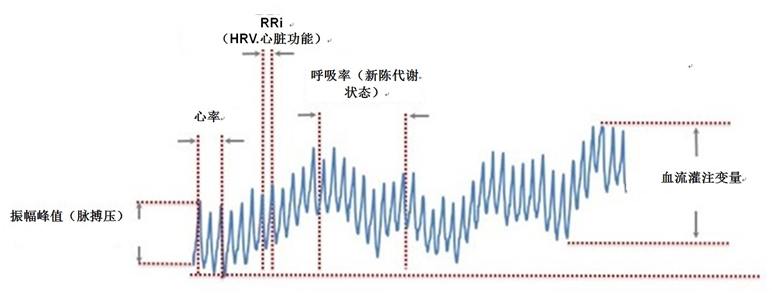
| 光学心率传感器可生成测量心率的PPG波形并将该心率数据作为基础生物计量值,但是利用PPG波形可以测量的对象远不止于此。图3是经过简化的PPG信号,该信号代表了多个生物计量的测量结果。 | 光学心率传感器可生成测量心率的PPG波形并将该心率数据作为基础生物计量值,但是利用PPG波形可以测量的对象远不止于此。图3是经过简化的PPG信号,该信号代表了多个生物计量的测量结果。 | ||
| - |  | + | {{ :ppg_waveform.png?600 |}} |
| 图 3:典型的PPG波形 | 图 3:典型的PPG波形 | ||
| 行 50: | 行 50: | ||
| ##### 光学心率传感器选择绿光作为光源的原因 | ##### 光学心率传感器选择绿光作为光源的原因 | ||
| - | {{:sunshine.jpg?600|}} | + | {{ :sunshine.jpg?600 |}} |
| 图 4:光谱 | 图 4:光谱 | ||
| 行 64: | 行 64: | ||
| 7. 虽然现在大部分智能穿戴设备采用绿光作为光源,但是字考虑到皮肤情况的不同(肤色、汗水),高端产品会根据情况自动使用绿光、红光和红外光等多种光源进行心率测量。 | 7. 虽然现在大部分智能穿戴设备采用绿光作为光源,但是字考虑到皮肤情况的不同(肤色、汗水),高端产品会根据情况自动使用绿光、红光和红外光等多种光源进行心率测量。 | ||
| - | {{:optical_hrm_circuit.png?500|}} | + | {{ :optical_hrm_circuit.png?500 |}} |
| - | 图 5 光电式心率传感电路 | + | 图 5: 光电式心率传感电路 |
| #### 电极式心率传感器 | #### 电极式心率传感器 | ||
| 行 113: | 行 113: | ||
| ### 4. 主要的心率传感器供应商 | ### 4. 主要的心率传感器供应商 | ||
| - | - [Maxim Integrated](https://www.maximintegrated.com/en/storefront/storefront.html) | + | - [Maxim Integrated](https://www.maximintegrated.com/en/storefront/storefront.html):Maxim Integrated是一家知名的集成电路设计和生产公司,提供多种心率传感器芯片和模块。其中,MAX30102是一款常见的心率传感器模块,集成了红外LED、红光LED和光电传感器,适用于便携设备和健康监测设备等应用。 |
| - | - [Texas Instruments(TI)](https://www.ti.com.cn/zh-cn/data-converters/integrated-special-function/medical-afes/biosensing-afes/products.html) | + | - [Texas Instruments(TI)](https://www.ti.com.cn/zh-cn/data-converters/integrated-special-function/medical-afes/biosensing-afes/products.html):TI是一家全球领先的半导体公司,提供多款生物传感器芯片和模块。AFE4404是TI的一款心率监测芯片,集成了红外LED、绿光LED、光电传感器和ADC等功能,可实现高精度的心率和血氧浓度测量。 |
| - | - [ROHM Semiconductor](https://www.mouser.cn/c/sensors/optical-sensors/light-to-frequency-light-to-voltage/) | + | - [ROHM Semiconductor](https://www.mouser.cn/c/sensors/optical-sensors/light-to-frequency-light-to-voltage/):ROHM Semiconductor是一家领先的半导体制造商,其心率传感器芯片和模块在市场上得到广泛应用。BH1790GLC是ROHM的一款红外心率传感器芯片,具备运动伪影抑制和高精度测量特性。 |
| - | - [Analog Devices(ADI)](https://www.analog.com/en/parametricsearch/13051#/) | + | - [Analog Devices(ADI)](https://www.analog.com/en/parametricsearch/13051#/):Analog Devices(ADI)是一家知名的模拟与数字混合信号处理技术供应商,提供多种生物传感器芯片和模块。AD8232是ADI的一款心率传感器芯片,专为心电图(ECG)采集设计,具备高性能和低功耗特点。 |
| - | - [PixArt Imaging](https://os.mbed.com/teams/PixArt/code/PixArt_PAH8011_HeartRate_NUCLEO-L476RG/) | + | - [PixArt Imaging](https://os.mbed.com/teams/PixArt/code/PixArt_PAH8011_HeartRate_NUCLEO-L476RG/):PixArt Imaging是一家专注于光学传感器和图像处理技术的公司,其产品被广泛应用于健康监测和运动追踪等领域。PAH8011是PixArt的一款生物传感器模块,集成了红外和绿光LED、光电传感器以及信号处理电路,适用于心率和血氧浓度等生物参数测量。 |
| ### 5. 参考案例 | ### 5. 参考案例 | ||
| 行 127: | 行 127: | ||
| [AD8232 ECG模块引脚排列,与Arduino接口,应用 (microcontrollerslab.com)](https://microcontrollerslab.com/ad8232-ecg-module-pinout-interfacing-with-arduino-applications-features/) | [AD8232 ECG模块引脚排列,与Arduino接口,应用 (microcontrollerslab.com)](https://microcontrollerslab.com/ad8232-ecg-module-pinout-interfacing-with-arduino-applications-features/) | ||
| + | **下面是个人案例,使用Mircopython编写程序驱动RP2040读取Max30102的数据。** | ||
| + | |||
| + | ####电路连接 | ||
| + | |||
| + | {{ :rp2040-max30102.png?900 |}} | ||
| + | |||
| + | ####程序代码 | ||
| + | |||
| + | 驱动文件包含三个.py文件。 | ||
| + | |||
| + | - _init_.py | ||
| + | - circular_buffer.py | ||
| + | - 检测心率.py | ||
| + | |||
| + | 前面两个文件可在后面链接中下载:https://github.com/n-elia/MAX30102-MicroPython-driver/tree/main/max30102 | ||
| + | |||
| + | 检测心率.py程序如下 | ||
| + | |||
| + | from machine import SoftI2C, Pin, Timer | ||
| + | from utime import ticks_diff, ticks_us | ||
| + | from max30102 import MAX30102, MAX30105_PULSE_AMP_MEDIUM | ||
| + | |||
| + | BEATS = 0 # 存储心率 | ||
| + | FINGER_FLAG = False # 默认表示未检测到手指 | ||
| + | |||
| + | |||
| + | def display_info(t): | ||
| + | # 如果没有检测到手指,那么就不显示 | ||
| + | if FINGER_FLAG is False: | ||
| + | return | ||
| + | |||
| + | print('心率: ', BEATS) | ||
| + | |||
| + | |||
| + | def main(): | ||
| + | global BEATS, FINGER_FLAG # 如果需要对全局变量修改,则需要global声明 | ||
| + | | ||
| + | # 创建I2C对象(检测MAX30102) | ||
| + | i2c = SoftI2C(sda=Pin(16), scl=Pin(17), freq=400000) # Fast: 400kHz, slow: 100kHz | ||
| + | |||
| + | # 创建传感器对象 | ||
| + | sensor = MAX30102(i2c=i2c) | ||
| + | |||
| + | # 检测是否有传感器 | ||
| + | if sensor.i2c_address not in i2c.scan(): | ||
| + | print("没有找到传感器") | ||
| + | return | ||
| + | elif not (sensor.check_part_id()): | ||
| + | # 检查传感器是否兼容 | ||
| + | print("检测到的I2C设备不是MAX30102或者MAX30105") | ||
| + | return | ||
| + | else: | ||
| + | print("传感器已识别到") | ||
| + | |||
| + | print("使用默认配置设置传感器") | ||
| + | sensor.setup_sensor() | ||
| + | |||
| + | # 对传感器进行设定 | ||
| + | sensor.set_sample_rate(400) | ||
| + | sensor.set_fifo_average(8) | ||
| + | sensor.set_active_leds_amplitude(MAX30105_PULSE_AMP_MEDIUM) | ||
| + | |||
| + | t_start = ticks_us() # Starting time of the acquisition | ||
| + | |||
| + | MAX_HISTORY = 32 | ||
| + | history = [] | ||
| + | beats_history = [] | ||
| + | beat = False | ||
| + | |||
| + | while True: | ||
| + | sensor.check() | ||
| + | if sensor.available(): | ||
| + | # FIFO 先进先出,从队列中取数据。都是整形int | ||
| + | red_reading = sensor.pop_red_from_storage() | ||
| + | ir_reading = sensor.pop_ir_from_storage() | ||
| + | | ||
| + | if red_reading < 1000: | ||
| + | print('No finger') | ||
| + | FINGER_FLAG = False # 表示没有放手指 | ||
| + | continue | ||
| + | else: | ||
| + | FINGER_FLAG = True # 表示手指已放 | ||
| + | |||
| + | # 计算心率 | ||
| + | history.append(red_reading) | ||
| + | | ||
| + | # 为了防止列表过大,这里取列表的后32个元素 | ||
| + | history = history[-MAX_HISTORY:] | ||
| + | | ||
| + | # 提取必要数据 | ||
| + | minima, maxima = min(history), max(history) | ||
| + | threshold_on = (minima + maxima * 3) // 4 # 3/4 | ||
| + | threshold_off = (minima + maxima) // 2 # 1/2 | ||
| + | | ||
| + | if not beat and red_reading > threshold_on: | ||
| + | beat = True | ||
| + | t_us = ticks_diff(ticks_us(), t_start) | ||
| + | t_s = t_us/1000000 | ||
| + | f = 1/t_s | ||
| + | bpm = f * 60 | ||
| + | if bpm < 500: | ||
| + | t_start = ticks_us() | ||
| + | beats_history.append(bpm) | ||
| + | beats_history = beats_history[-MAX_HISTORY:] # 只保留最大30个元素数据 | ||
| + | BEATS = round(sum(beats_history)/len(beats_history), 2) # 四舍五入 | ||
| + | if beat and red_reading < threshold_off: | ||
| + | beat = False | ||
| + | |||
| + | |||
| + | if __name__ == '__main__': | ||
| + | |||
| + | tim = Timer(period=1000, mode=Timer.PERIODIC, callback=display_info) | ||
| + | | ||
| + | main() | ||
| + | |||
| + | ####运行效果 | ||
| + | |||
| + | {{ :hrm_test.png?400 |}} | ||