项目介绍
本项目基于M5StickC Plus,基于M5StickC Plus SDK,使用Arduino与VSCode开发(用不惯Arduino IDE),通过软SPI驱动两块LED矩阵,作为电子沙漏,实现按键控制电子沙漏工作状态、定时、在LCD上显示倒计时,同时随倒计时,在LED矩阵上显示沙漏滴落的动态效果。
👉 参考项目:LED Matrix Hourglass Created by Ruiz Brothers
硬件介绍
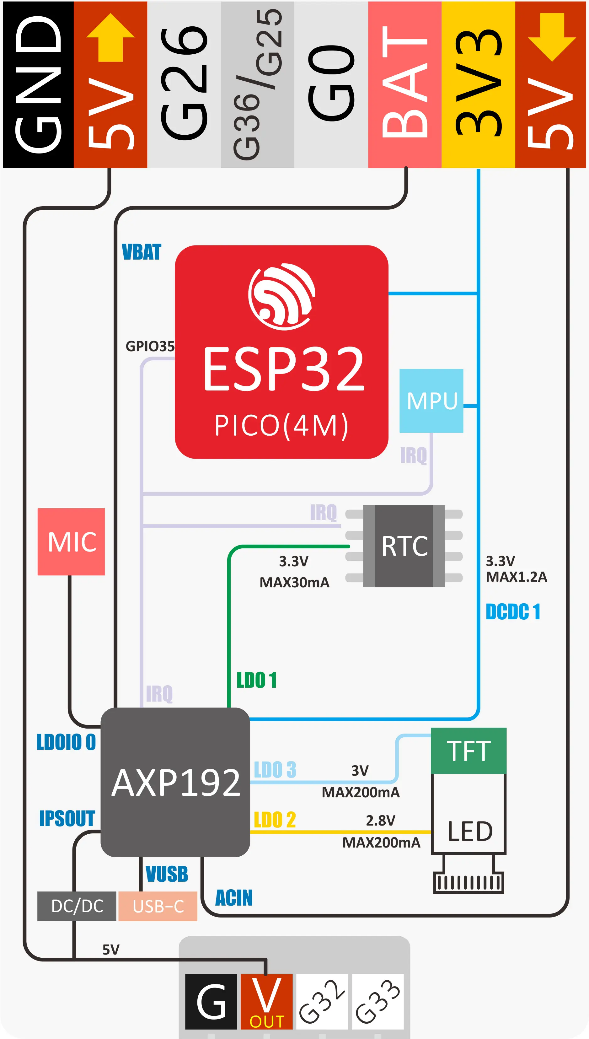
M5StickC Plus是M5StickC的大屏幕版本,主控采用ESP32-PICO-D4模组,具备蓝牙4.2与WIFI功能,小巧的机身内部集成了丰富的硬件资源,如红外、RTC、麦克风、LED、IMU、按键、蜂鸣器、PMU等,在保留原有M5StickC功能的基础上加入了无源蜂鸣器,同时屏幕尺寸升级到1.14寸、135*240分辨率的TFT屏幕,相较之前的0.96寸屏幕增加18.7%的显示面积,电池容量达到120mAh,接口同样支持HAT与Unit系列产品。
👉 更多介绍
1. 2022暑期在家一起练(2)- 基于M5StickC Plus的综合应用
2. M5StickC PLUS with Watch Accessories
产品特性
- 基于ESP32开发,支持WiFi、蓝牙
- 内置3轴加速计与3轴陀螺仪
- 内置Red LED
- 集成红外发射管
- 内置RTC
- 集成麦克风
- 用户按键,LCD(1.14寸),电源/复位按键
- 120mAh 锂电池
- 拓展接口
- 集成无源蜂鸣器
- 可穿戴 & 可固定
- 开发平台:UIFlow、MicroPython、Arduino
开发环境搭建
在此仅说明Arduino的环境搭建。
👉 Arduino IDE 环境搭建
👉 M5StickC Plus SDK
最后,如果你能忍受Arduino,那就用吧。我反正用VSCode中的Arduino插件去了。
硬件结构及说明
本项目硬件组成:两块LED矩阵上有两片74595,可以使用软SPI方式驱动灯板。限于M5引出的IO口有限(且下方的IO口用杜邦线引出十分不牢固),两路SPI总线(data、clock、latch)可以共用数据与Latch线,而不共用时钟线,通过面包板连接。
左下角LED灯板为沙漏⌛的上方,其沙粒从右下角流至第二块灯板的左上角。当然,使用IMU可以实现重力感应而倒流,但是与倒计时功能结合更加复杂,就没做。
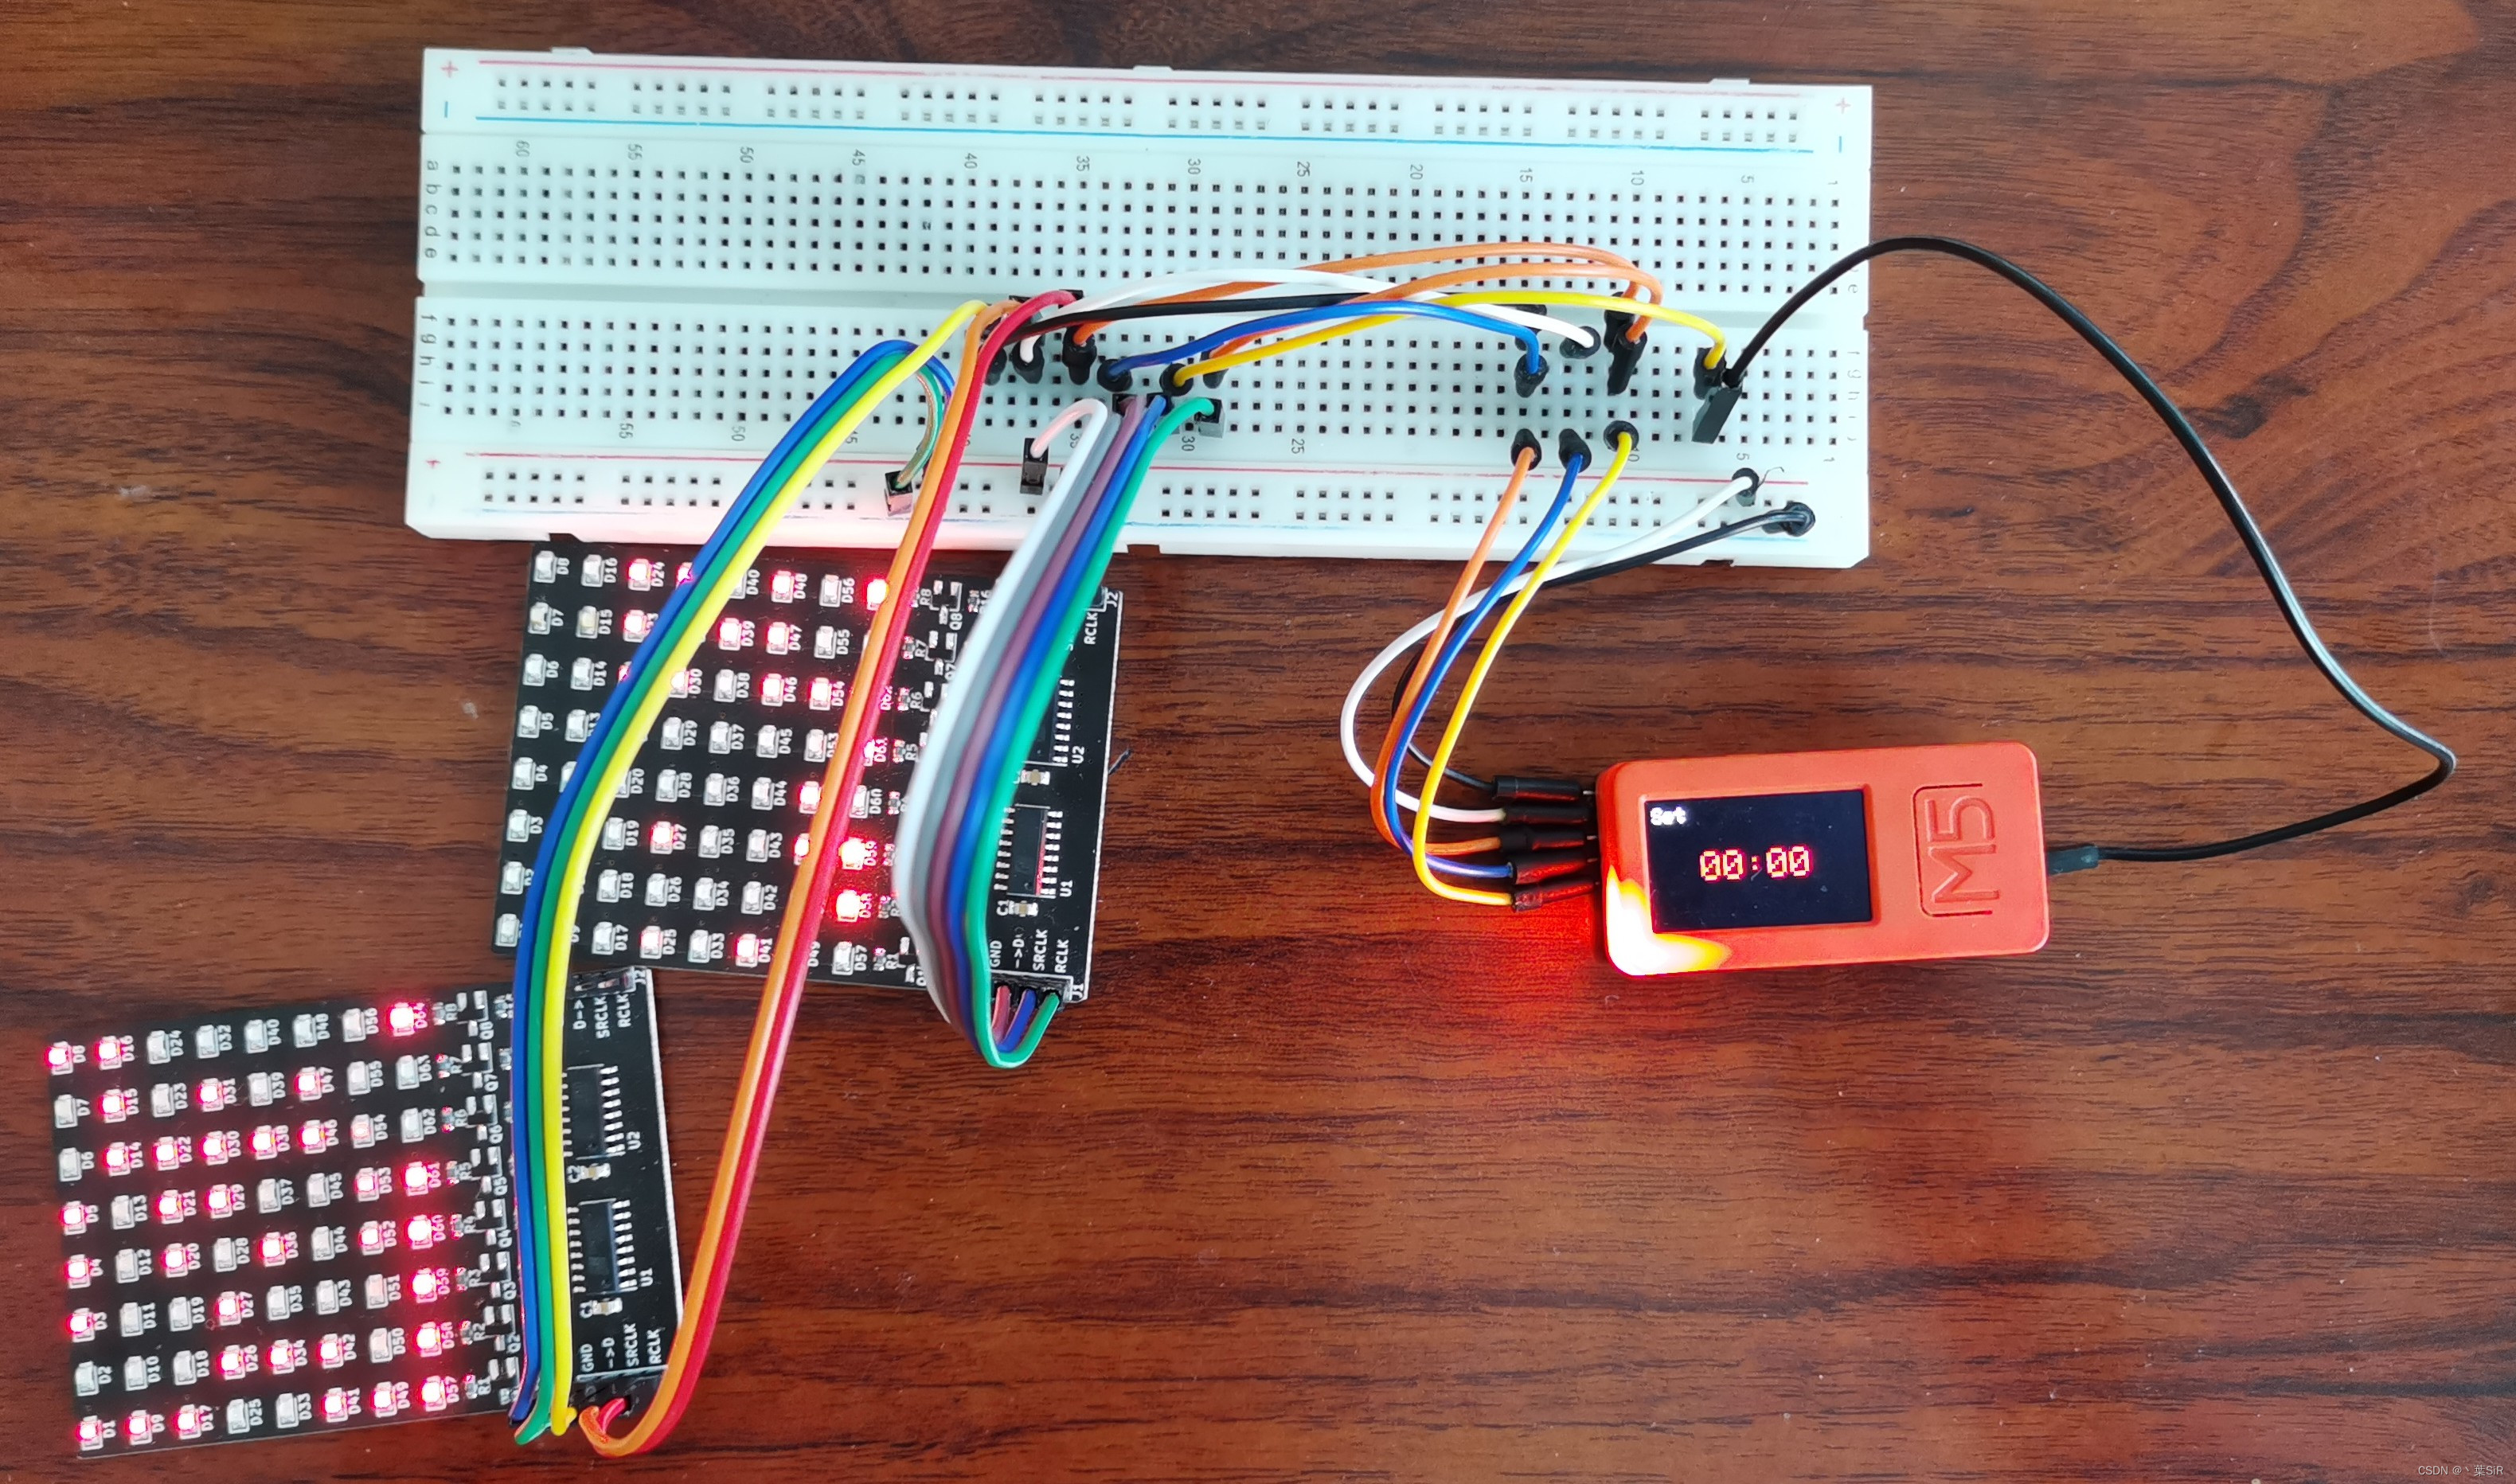
灯板与M5的具体连接关系:
| 引脚 | 含义 | 引脚编号 |
| G26 | 数据信号 | 26 |
| G25 | 时钟信号1 | 25 |
| G33 | 时钟信号2 | 33 |
| G0 | Latch信号 | 0 |
| G36 | 复用IO,设置浮空输入 | 36 |
👉 由于G25与G36共用一个IO口,使用G25需要将G36设置浮空输入,如下
#define MUTEX_PIN    GPIO_NUM_36
gpio_pulldown_dis(MUTEX_PIN);
gpio_pullup_dis(MUTEX_PIN);
软件结构及说明
软件工程组成:软SPI驱动、LED矩阵驱动、矩阵沙的动态效果计算、电子沙漏顶层类、定时器(与中断服务)及非阻塞延时的功能函数。软件主要工作流程:

软SPI驱动类
👉 参考:Github-bxparks/AceSPI中对软SPI的包装
类内包装了软SPI的数据传输的方法、包括简单的全部清除、点亮等操作,代码参见./include/softspi.h,在此展示主要函数:
#ifndef _SOFTSPI_H
#define _SOFTSPI_H

#include <Arduino.h>
namespace softspi {
class SoftSpi {
    public:
    SoftSpi(uint8_t latchPin, uint8_t dataPin, uint8_t clockPin, bool auto_write=true):
        mLatchPin(latchPin),
        mDataPin(dataPin),
        mClockPin(clockPin),
        auto_write(auto_write){this->fill(false); };

    void show(void) const;
    void fill(bool color=true);
    void write(const uint8_t data[8]);
    void _pixel(int x, int y, bool filled);
    bool _get_pixel(int x, int y) const;

    /** Initialize the various pins. */
    void begin(void) const;

    /** Reset the various pins. */
    void end(void) const;

    /** Begin SPI transaction. Pull latch LOW. */
    void beginTransaction(void) const;

    /** End SPI transaction. Pull latch HIGH. */
    void endTransaction(void) const;

    /** Transfer 8 bits. */
    void transfer(uint8_t value) const;

    /** Transfer 16 bits. */
    void transfer16(uint16_t value) const;

    /** Convenience method to send 8 bits a single transaction. */
    void send8(uint8_t value) const;

    /** Convenience method to send 16 bits a single transaction. */
    void send16(uint16_t value) const;

    /** Convenience method to send 16 bits a single transaction. */
    void send16(uint8_t msb, uint8_t lsb) const;

    protected:
    const bool auto_write;
    uint8_t _buffer[8];

    private:
    uint8_t const mLatchPin;
    uint8_t const mDataPin;
    uint8_t const mClockPin;
};
}
#endif
LED矩阵操作类
👉 参考:Github-adafruit/Adafruit_CircuitPython_HT16K33中的matrix.py,用C++实现
LED矩阵操作类继承自上述SoftSpi,控制一块灯板的buffer(uint8_t _buffer[8]),从0~7依次控制各每行像素的亮灭与移动。文件参见./include/ledmatrix.h、./src/ledmatrix.cpp,在此展示主要函数:
#ifndef _LEDMATRIX_H_
#define _LEDMATRIX_H_

#include "softspi.h"
#define _COLUMNS 8
#define _ROWS    8

using softspi::SoftSpi;
class LedMatrix: public SoftSpi {
    public:
    LedMatrix(uint8_t latchPin, uint8_t dataPin, uint8_t clockPin, bool auto_write=true):
        SoftSpi(latchPin, dataPin, clockPin, auto_write) {
            this->begin();
        };

    void pixel(int x, int y, bool filled=true);
    bool pixel(int x, int y);
    void shift(int x, int y, bool rotate=false);
    uint8_t get_line(int x) const {return this->_buffer[x]; }
    void shift_right(bool rotate=false) {this->shift(1, 0, rotate); }
    void shift_left(bool rotate=false) {this->shift(-1, 0, rotate); }
    void shift_up(bool rotate=false) {this->shift(0, 1, rotate); }
    void shift_down(bool rotate=false) {this->shift(10, -1, rotate); }
    bool __getitem__(int _x, int _y) {return this->_get_pixel(_x, _y); }
    void __setitem__(int _x, int _y, bool value) {this->pixel(_x, _y, value); }

    private:
    bool _auto_write;
    int columns = _COLUMNS;
    int rows = _ROWS;
};

#endif
#include "../include/ledmatrix.h"

void LedMatrix::pixel(int x, int y, bool filled) {
    assert(x >= 0 and x <= 7);
    assert(y >= 0 and y <= 7);
    this->_pixel(x, y, filled);
}

bool LedMatrix::pixel(int x, int y) {
    assert(x >= 0 and x <= 7);
    assert(y >= 0 and y <= 7);
    return this->_get_pixel(x, y);
}

/*
    Shift pixels by x and y
    :param int x: The x coordinate of the pixel
    :param int y: The y coordinate of the pixel
    :param bool rotate: Rotate the shifted pixels to the left side (default=False)
*/
void LedMatrix::shift(int x, int y, bool rotate) {
    int i, row, col;
    bool auto_write = this->auto_write;
    bool last_pixel;
    this->_auto_write = false;

    if (x > 0) {
        for (i = 0; i < x; i++) {
            for (row = 0; row < this->rows; row++) {
                last_pixel = (rotate) ? this->__getitem__(this->columns - 1, row) : 0;
                for (col = this->columns - 1; col > 0; col--) {
                    this->__setitem__(col, row, this->__getitem__(col - 1, row));
                }
                this->__setitem__(0, row, last_pixel);
            }
        }
    }
    else if (x < 0) {
        for (i = 0; i < -x; i++) {
            for (row = 0; row < this->rows; row++) {
                last_pixel = (rotate) ? this->__getitem__(0, row) : 0;
                for (col = 0; col < this->columns - 1; col++) {
                    this->__setitem__(col, row, this->__getitem__(col + 1, row));
                }
                this->__setitem__(this->columns - 1, row, last_pixel);
            }
        }
    }

    if (y > 0) {
        for (i = 0; i < y; i++) {
            for (col = 0; col < this->columns; col++) {
                last_pixel = (rotate) ? this->__getitem__(col, this->rows - 1) : 0;
                for (row = this->rows - 1; row > 0; row--) {
                    this->__setitem__(col, row, this->__getitem__(col, row - 1));
                }
                this->__setitem__(col, 0, last_pixel);
            }
        }
    }
    else if (y < 0) {
        for (i = 0; i < -y; i++) {
            for (col = 0; col < this->columns; col++) {
                last_pixel = (rotate) ? this->__getitem__(col, 0) : 0;
                for (row = 0; row < this->rows - 1; row++) {
                    this->__setitem__(col, row, this->__getitem__(col, row + 1));
                }
                this->__setitem__(col, this->rows - 1, last_pixel);
            }
        }
    }

    this->_auto_write = auto_write;
    if (_auto_write) {
        this->show();
    }
}
虽然void shift(int x, int y, bool rotate=false)函数没有用到,但还是用C++重写了
矩阵沙的动态效果计算
👉 参考:Github-adafruit/Adafruit_Learning_System_Guides中的matrixsand.py,用C++实现
该类主要实现8x8沙子的动态效果计算,将数据赋值给LED矩阵的buffer,从而在灯板上展现沙漏滴落与堆积的动态效果。
其中bool iterate(float ax, float ay, float az)通过读取IMU,实现沙子随重力方向落下的动态效果迭代(虽然最后并没有采用)。代码参见./include/matrixsand.h,在此展示主要函数:
#ifndef _MATRIXSAND_H_
#define _MATRIXSAND_H_

#include <vector>
#include <tuple>

namespace matrix_sand {
class MatrxiSand {
    public:
    MatrxiSand(int width, int height, bool enable=false): _width(width), _height(height) {
        this->_grains.assign(width * height, false);
    }

    bool __getitem__(int value) {
        return this->_grains[value];
    }

    bool __getitem__(int _x, int _y) {
        return this->_grains[_x + this->_width * _y];
    }

    void __setitem__(int value, bool key) {
        this->_grains[value] = key;
    }

    void __setitem__(int _x, int _y, bool key) {
        this->_grains[_x + this->_width * _y] = key;
    }

    void clear(void) {
        this->_grains.assign(this->_width * this->_height, false);
    }

    std::tuple<int, int> _side_count(bool upside_down=false) {
        int left = 0, right = 0;
        int x, y;
        for (x = 0; x < this->_width; x++) {
            for (y = 0; y < this->_height; y++) {
                if (x != y and this->__getitem__(x, y)) {
                    if (x > y) {
                        right += 1;
                    }
                    else {
                        left += 1;
                    }
                }
            }
        }
        if (upside_down) {
            return std::tuple<int, int>(right ,left);
        }
        else {
            return std::tuple<int, int>(left, right);
        }
    }

    bool iterate(float ax, float ay, float az) {
        int ix = 0, iy = 0;
        int x, y, newx, newy;
        int left, right;
        float ratio;
        std::vector<bool> new_grains;
        bool updated, moved;

        if (abs(az) > abs(ax) and abs(az) > abs(ay)) {
            return false;
        }

        if (abs(ax) > 0.01) {
            ratio = abs(ay / ax);
            if (ratio < 2.414) {
                ix = (ax > 0) ? 1 : -1;
            }
            if (ratio > 0.414) {
                iy = (ay > 0) ? 1 : -1;
            }
        }
        else {
            iy = (ay > 0) ? 1 : -1;
        }

        new_grains = this->_grains;
        updated = false;
        for (x = 0; x < this->_width; x++) {
            for (y = 0; y < this->_height; y++) {
                if (this->__getitem__(x, y)) {
                    moved = false;
                    newx = x + ix;
                    newy = y + iy;

                    newx = max(min(this->_width-1, newx), 0);
                    newy = max(min(this->_height-1, newy), 0);

                    if (x != newx or y != newy) {
                        moved = true;
                        if (new_grains[newx + this->_width * newy]) {
                            if (not new_grains[x + this->_width * newy] and \
                                not new_grains[newx + this->_width * y]) {
                                std::tuple<int, int>(left, right) = this->_side_count(ax < 0 and ay < 0);
                                if (left >= right) {
                                    newy = y;
                                }
                                else if (right > left) {
                                    newx = x;
                                }
                            }
                            else if (not new_grains[x + this->_width * newy]) {
                                newx = x;
                            }
                            else if (not new_grains[newx + this->_width * y]) {
                                newy = y;
                            }
                            else {
                                moved = false;
                            }
                        }
                    }
                    if (moved) {
                        new_grains[x + this->_width * y] = false;
                        new_grains[newx + this-> _width * newy] = true;
                        updated = true;
                    }
                }
            }
        }
        if (updated) {
            this->_grains = new_grains;
        }
        return updated;
    }

    private:
    int _width;
    int _height;
    std::vector<bool> _grains;
};
}
#endif
电子沙漏顶层类
该类主要包含上述两个LED矩阵对象(LedMatrix)与矩阵沙对象(matrix_sand::MatrxiSand),用以映射灯板的数据buffer,做动态效果的迭代计算,再赋值给灯板的buffer,实现显示。
除此之外,该类还定义了有关电子沙漏的方法:初始化、开始、暂停、停止等。代码参见./include/sandglass.h:
#ifndef _SANDGLASS_H_
#define _SANDGLASS_H_

#include "../include/ledmatrix.h"
#include "../include/matrixsand.h"

#define LEDMATRIX_START_LAYER   11  // More than 8 is well

typedef struct {
    int mins;
    int secs;
} Countdown_TypeDef;

class Sandglass {
    public:
    Sandglass();

    matrix_sand::MatrxiSand sand1;
    matrix_sand::MatrxiSand sand2;

    LedMatrix m1;
    LedMatrix m2;

    void init(void);
    void start(Countdown_TypeDef* CountdownStruct);
    void pause(void);
    void resume(void);
    void restart(Countdown_TypeDef* CountdownStruct);
    void IRAM_ATTR clock_update(void);
    void tick(void);
    void stop(bool is_shutdown=false);
    void show_countdown(Countdown_TypeDef* CountdownStruct);
    bool is_activated(void);
    bool is_working(void);
    bool isTick;                        // Update led matrices when in the second interval and after

    // Led matrices related
    void random_idle(void);             // When in idle, two led matrices blink randomly
    void IRAM_ATTR ledmatrix_update(void);
    void IRAM_ATTR frame_refresh(void); // Frame refreshment
    int frame_refresh_interval;         // Interval of frame refreshement, unit ms
    bool need_lm_refresh;               // Refresh led matrices data

    private:
    void update_matrix(LedMatrix *m, matrix_sand::MatrxiSand *s);

    // Led matrices related
    float accX, accY, accZ, xx, yy, zz;
    bool updated1, updated2;

    // Clock related
    bool isActivated;
    bool isWorking;
    Countdown_TypeDef rest_time;        // Rest time of countdown: mins and secs
    Countdown_TypeDef last_set_time;    // Record the last time of countdown/settime
};

#endif
更新倒计时的算法很简单:
void IRAM_ATTR Sandglass::clock_update(void) {
    this->rest_time.mins = (this->rest_time.secs == 0) ? this->rest_time.mins - 1 : this->rest_time.mins;
    this->rest_time.secs = (this->rest_time.secs == 0) ? 59 : this->rest_time.secs - 1;
    this->isTick = false;

    // Show countdown
    this->show_countdown(&this->rest_time);

    if (this->rest_time.mins == 0 and this->rest_time.secs == 0) {
        this->stop();
    }
}
在Sandglass::start(Countdown_TypeDef* CountdownStruct)方法下,传入设定的倒计时时间至this->rest_time,之后每秒钟根据上一时刻时间更新下一时刻时间。
⚠️ 注意先更新分钟,再更新秒钟,最后判断是否到达0
硬件定时器(及中断服务)与非阻塞延时函数
硬件定时器
原本使用RTC与非阻塞延时实现倒计时,且每秒读取RTC一次,但是由于两LED灯板还需要尽可能多的刷新(尽可能多的刷新灯板使其显示保持稳定),怕不精确,因此使用硬件定时器:每秒产生一次中断,在中断内置一标志位bool sandglass.isTick,在主循环内判断此标志位完成倒计时数据的更新,并复位标志位。
其次,是为了实现沙漏动态效果满足在用户设置的时间内,上层LED灯板的沙粒全部落下,因此需要计算数据刷新的间隔(毫秒级),使用硬件定时器更为精确。
M5的定时器时钟为80M(TIMER_BASE_CLK)。定时器的构造与启动参见代码./include/bsp_timer.cpp:
👉 为方便,定义创建周期为1s与毫秒定时器
#include "esp32-hal-timer.h"
#include "driver/timer.h"

hw_timer_t* timer1s(uint8_t num, void (*fn)(void), bool autoreload) {
    hw_timer_t* timer = timerBegin(num, (TIMER_BASE_CLK / 1000000), true);
    timerStop(timer);
    timerAttachInterrupt(timer, fn, false);
    timerAlarmWrite(timer, 1000000, autoreload);
    timerAlarmEnable(timer);
    timerRestart(timer);
    timerStart(timer);

    return timer;
}

hw_timer_t* milli_timer(int milli, uint8_t num, void (*fn)(void), bool autoreload) {
    hw_timer_t* timer = timerBegin(num, (TIMER_BASE_CLK / 1000000), true);
    timerStop(timer);
    timerAttachInterrupt(timer, fn, false);
    timerAlarmWrite(timer, 1000 * milli, autoreload);
    timerAlarmEnable(timer);
    timerRestart(timer);
    timerStart(timer);

    return timer;
}创建两个定时器直接用函数包装,且判断当定时器已创建则直接重新运行。两中断服务函数,主要完成每秒置isTick标志位;每个LED灯板数据刷新的时间间隔,置need_lm_refresh标志位。
hw_timer_t* clock_timer = NULL;
hw_timer_t* update_timer = NULL;
static void clock_update(void);
static void ledmatrix_refresh(void);
static void start_timers(void);
...
/*
    Creat or start this clock_timer. If created, just restart and start it.
    Attention. Because of reseting function, update_timer need to be created every time.
*/
static void start_timers(void) {
    if (clock_timer == NULL) {
        clock_timer = timer1s(0, clock_update, true);   // Using Timer 0
        if (clock_timer == NULL) {
            Serial.println("Start clock_timer error!");
        }
    }
    else {
        timerRestart(clock_timer);
        timerStart(clock_timer);
    }

    update_timer = milli_timer(sandglass.frame_refresh_interval, 1, ledmatrix_refresh, true);
    if (update_timer == NULL) {
        Serial.println("Start update_timer error!");
    }
}

static void clock_update(void) {
    sandglass.tick();
    led_heartbeat();
}

static void ledmatrix_refresh(void) {
    sandglass.need_lm_refresh = true;
}
非阻塞延时
通过millis()记录时间并判断,代码参见./include/nonblock_delay.h、./src/nonblockdelay.cpp:
#ifndef _NONBLOCK_DELAY_H_
#define _NONBLOCK_DELAY_H_

#include <Arduino.h>

class NonBlockDelay {
    public:
    void Delay(unsigned long);
    bool Timeout(void);
    unsigned long Time(void);

    private:
    unsigned long iTimeout;
};

#endif
#include "../include/nonblock_delay.h"
void NonBlockDelay::Delay(unsigned long t)
{
this->iTimeout = millis() + t;
return;
};
bool NonBlockDelay::Timeout(void)
{
return (this->iTimeout < millis());
}
unsigned long NonBlockDelay::Time(void)
{
return this->iTimeout;
}LED矩阵刷新间隔
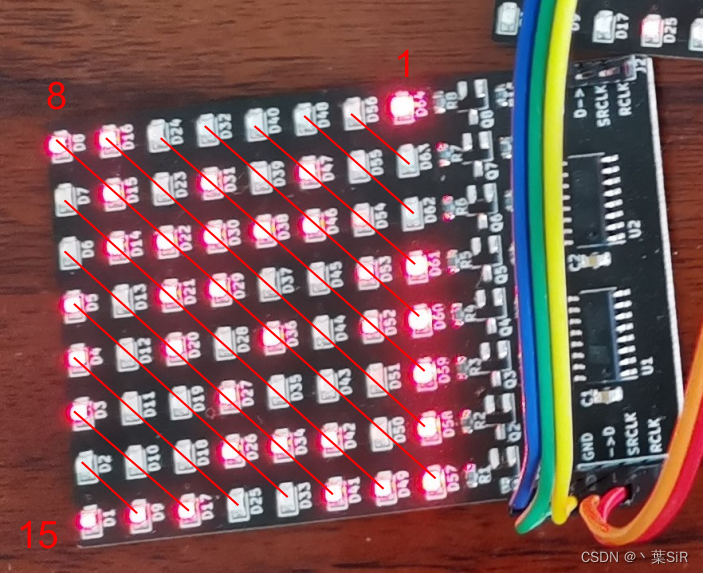
LED灯板的硬件决定了对其行刷新的顺序。由于沙漏是两块灯板对角线放置,因此:
- 设定沙漏层数:沙漏连接处为第1层、沿对角线方向划分为15层
- 沙漏计时效果:每1秒钟,一粒沙(一个LED)落至下方LED灯板(指其对应物理上的真实落点)
因此,计算一下不同初始层数(如此对应不同初始数量的沙子)开始下,需要多少次“滴落”的动作,才能完成整个过程,然后据此根据用户设置的定时,计算出不同帧的刷新间隔。
#define LEDMATRIX_START_LAYER   11  // More than 8 is well
int get_total_drop_steps(int _start_layer) {
    int _axis = 16 - _start_layer;
    int _add_to = 5 - (_start_layer - 7) / 2;
    int i, _total = 38;             // Need an amend value

    for (i = 8; i >= _add_to; i--) {
        _total += i * (i*2 - 1);    // + (16 - i);
        if (i <= _axis - 1) {
            _total -= 2*i * (_axis - i);
        }
    }

    return _total;
}
// 调用时
int frame_refresh_interval = (int)((CountdownStruct->mins * 60 + CountdownStruct->secs)*1000 / get_total_drop_steps(LEDMATRIX_START_LAYER)); // ms上述函数的计算原理简要为:
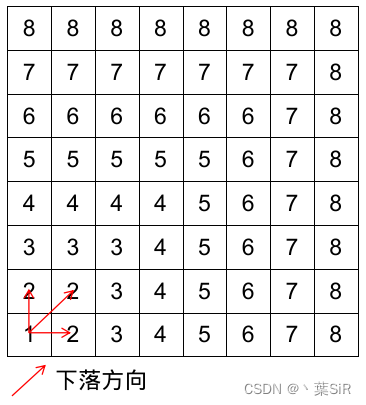
- 由于每粒沙模拟随重力作用滴落,上层沙粒掉落的起点永远是下方LED灯板的
(1, 1)处,并且滴落方向仅能向箭头所指的三个方向,然后经8次掉落至(8, 8);第二粒沙也从(1, 1)处出发,经过8次掉落至(7, 8)或(8, 7)(具体看代码),依次类推,每粒沙掉落至下方LED灯板各处需要滴落的次数都可计算。 - 同时,由于沙粒掉落,上方LED灯板也需要刷新,但其刷新计算是迭代算出,因此在上一时刻刚掉落下去的
(8, 8)处沙粒在下一时刻就被补齐,总有沙粒准备着在下一秒时下落,上方LED灯板沙粒的刷新间隔与下方保持一致即可。 - 例如,当初始状态为11层沙,视觉上比较好看(没见过沙漏整个上层全部填满),此时54粒沙,共345次滴落才完成。用户若定时1分30秒,则刷新间隔为261ms,该刷新任务由前述毫秒定时器完成。
后面整体沙漏完成后测试,发现刷新间隔还是过大,还需要补偿38~40次刷新,才使得视觉上满足倒计时结束所有沙粒落下。
外设初始化
为了不让.ino过于臃肿,工程的初始化与主循环均写到./src/user.cpp去了。
#include <M5StickCPlus.h>
#include "include/user.h"
void setup() {
    M5.begin();
    User_Setup();
}

void loop() {
    User_Loop();
}
User_Setup()对外设做初始化,LED、复用IO口置浮空输入、沙漏对象的例化与初始化、LCD初始化(旋转方向)、IMU初始化:
TFT_eSprite Disbuff = TFT_eSprite(&M5.Lcd);	// 用这个仿佛更方便一点
Sandglass sandglass;
static void Lcd_Setup(void);

void User_Setup(void) {
    int ret;
    pinMode(M5_LED, OUTPUT);
    gpio_pulldown_dis(MUTEX_PIN);
    gpio_pullup_dis(MUTEX_PIN);

    sandglass.init();
    Lcd_Setup();
    ret = M5.IMU.Init();

    if (ret != 0) {
        Serial.println("Init IMU error!");
    }
}

static void Lcd_Setup(void) {
    M5.Lcd.setRotation(1);          // Horizontal view
    M5.Lcd.fillScreen(TFT_BLACK);
    M5.Lcd.setTextSize(2);
    M5.Lcd.setCursor(M5.Lcd.width()/2 - M5.Lcd.textWidth("Hello World")/2, M5.Lcd.height()/2 - M5.Lcd.fontHeight()/2);
    M5.Lcd.setTextColor(TFT_RED);
    M5.Lcd.printf("Hello World");
    Disbuff.pushSprite(0, 0);

    delay(500);
    M5.Lcd.fillScreen(TFT_BLACK);
}
主循环
按键扫描
设置了在沙漏运行时(即开启倒计时)与闲时不同的按键扫描。闲时,扫描按键A、B:
- 长按按键A,开始倒计时,定时器工作;
- 短按按键A,设定的分钟+1,上限10分钟,设定的时间存入
CountdownStruct; - 短按按键B,设定的秒数+1,上限59秒;
- 长按按键B,设定的秒数+10;
Countdown_TypeDef CountdownStruct = {.mins = 0, .secs = 0};
static void Key_Handle_inIdle(void) {
    M5.Lcd.setCursor(10, 10);
    M5.Lcd.setTextSize(2);
    M5.Lcd.fillRect(10, 10, M5.Lcd.height(), M5.Lcd.fontHeight(), TFT_BLACK);
    M5.Lcd.setTextColor(TFT_WHITE);
    M5.Lcd.printf("Set");
    Disbuff.pushSprite(0, 0);

    d1.Delay(500);

    while (1) {
        M5.update();
        if (M5.BtnA.wasReleasefor(800)) {
            sandglass.start(&CountdownStruct);
            start_timers();
            break;
        }
        else if (M5.BtnA.wasReleased()) {
            if (CountdownStruct.mins == 10) {
                CountdownStruct.mins = 0;
            }
            else {
                CountdownStruct.mins += 1;
            }

        }
        else if (M5.BtnB.wasReleased()) {
            if (CountdownStruct.secs == 59) {
                CountdownStruct.secs = 0;
            }
            else {
                CountdownStruct.secs += 1;
            }
        }
        else if (M5.BtnB.wasReleasefor(800)) {
            if (CountdownStruct.secs >= 50) {
                CountdownStruct.secs = 0;
            }
            else {
                CountdownStruct.secs += 10;
            }
        }

        if (d1.Timeout()) {
            sandglass.random_idle();
            d1.Delay(500);
        }

        sandglass.frame_refresh();
        sandglass.show_countdown(&CountdownStruct);
        Disbuff.pushSprite(0, 0);

        // TODO If in idle, go into low-cost mode
    }
}
工作时,扫描按键:
- 短按按键A,暂停/继续;暂停时定时器停止,继续时定时器继续运行;
- 长按按键A,退出此次倒计时,恢复至闲时,重新设定倒计时,同时定时器停止;
- 短按按键B,倒计时重新开始,定时器先停止,后重新启动定时器;
M5.update();
    if (M5.BtnA.wasReleased()) {
        if (sandglass.is_working()) {
            sandglass.pause();
            // Pause the timers
            timerStop(clock_timer);
            timerStop(update_timer);

            // Delay 1s for displaying the "Pause"
            d2.Delay(1000);
        }
        else {
            sandglass.resume();
            // Resume the timers
            timerStart(clock_timer);
            timerStart(update_timer);

            d2.Delay(1000);
        }
    }
    else if (M5.BtnA.wasReleasefor(800)) {
        // Break to reset
        sandglass.stop(true);
        timerStop(clock_timer);
        timerStop(update_timer);

        // Set the flag to break in while loop
        _is_break = true;
    }
    else if (M5.BtnB.wasReleased()) {
        // Restart from the initial
        sandglass.restart(&CountdownStruct);
        timerStop(clock_timer);
        timerStop(update_timer);
        start_timers();

        d2.Delay(1000);
    }
主循环的主循环
当闲时设置好倒计时时间,并长按按键A,随即break出Key_Handle_inIdle()的循环,进入该循环。
void User_Loop(void) {

    if (not sandglass.is_activated()) {
        Key_Handle_inIdle();
    }

    while (1) {
        if (sandglass.isTick) {
            sandglass.clock_update();
        }

        if (sandglass.need_lm_refresh) {
            sandglass.ledmatrix_update();  // data update
        }

        if (not sandglass.is_activated()) {
            timerStop(clock_timer);
            timerStop(update_timer);
            break;
        }

        // Frame refresh as frequently as you can when not completed or tick.
        sandglass.frame_refresh();
        Key_Handle_inWorking();

        if (_is_break) {
            _is_break = false;
            break;
        }

        if (d2.Timeout()) {
            M5.Lcd.fillRect(10, 10, M5.Lcd.height(), M5.Lcd.fontHeight(), TFT_BLACK);
        }

#ifdef DEBUG_MODE
        M5.Lcd.setCursor(10, 100);
        M5.Lcd.setTextColor(TFT_WHITE);
        M5.Lcd.setTextSize(1);
        M5.Lcd.printf("%d ms", sandglass.frame_refresh_interval);
#endif
        Disbuff.pushSprite(0, 0);
    }
    delay(1000);
}
在该主循环内,判断:
isTick标志位是否置位,置位说明定时器计了1秒,随即更新时间,更新倒计时;need_lm_refresh标志位是否置位,置位说明该进行LED灯板数据的刷新,更新其动态效果的动作;if (not sandglass.is_activated())判断沙漏是否启动了(倒计时结束会关闭),若关闭了则跳出循环,重新进入闲时按键扫描;Key_Handle_inWorking()工作时的按键扫描,同前述;- 在(1秒中的)其余时间内,尽可能多地进行帧扫描(
sandglass.frame_refresh()),使得刷新率尽可能高,显示效果更稳定; _is_break,工作时的按键扫描的“长按按键A”置位的标志位;if (d2.Timeout()),工作时的按键按下时进行的LCD提示语句显示计时,仅显示1秒后刷新掉;
功能展示
倒计时及LCD部分
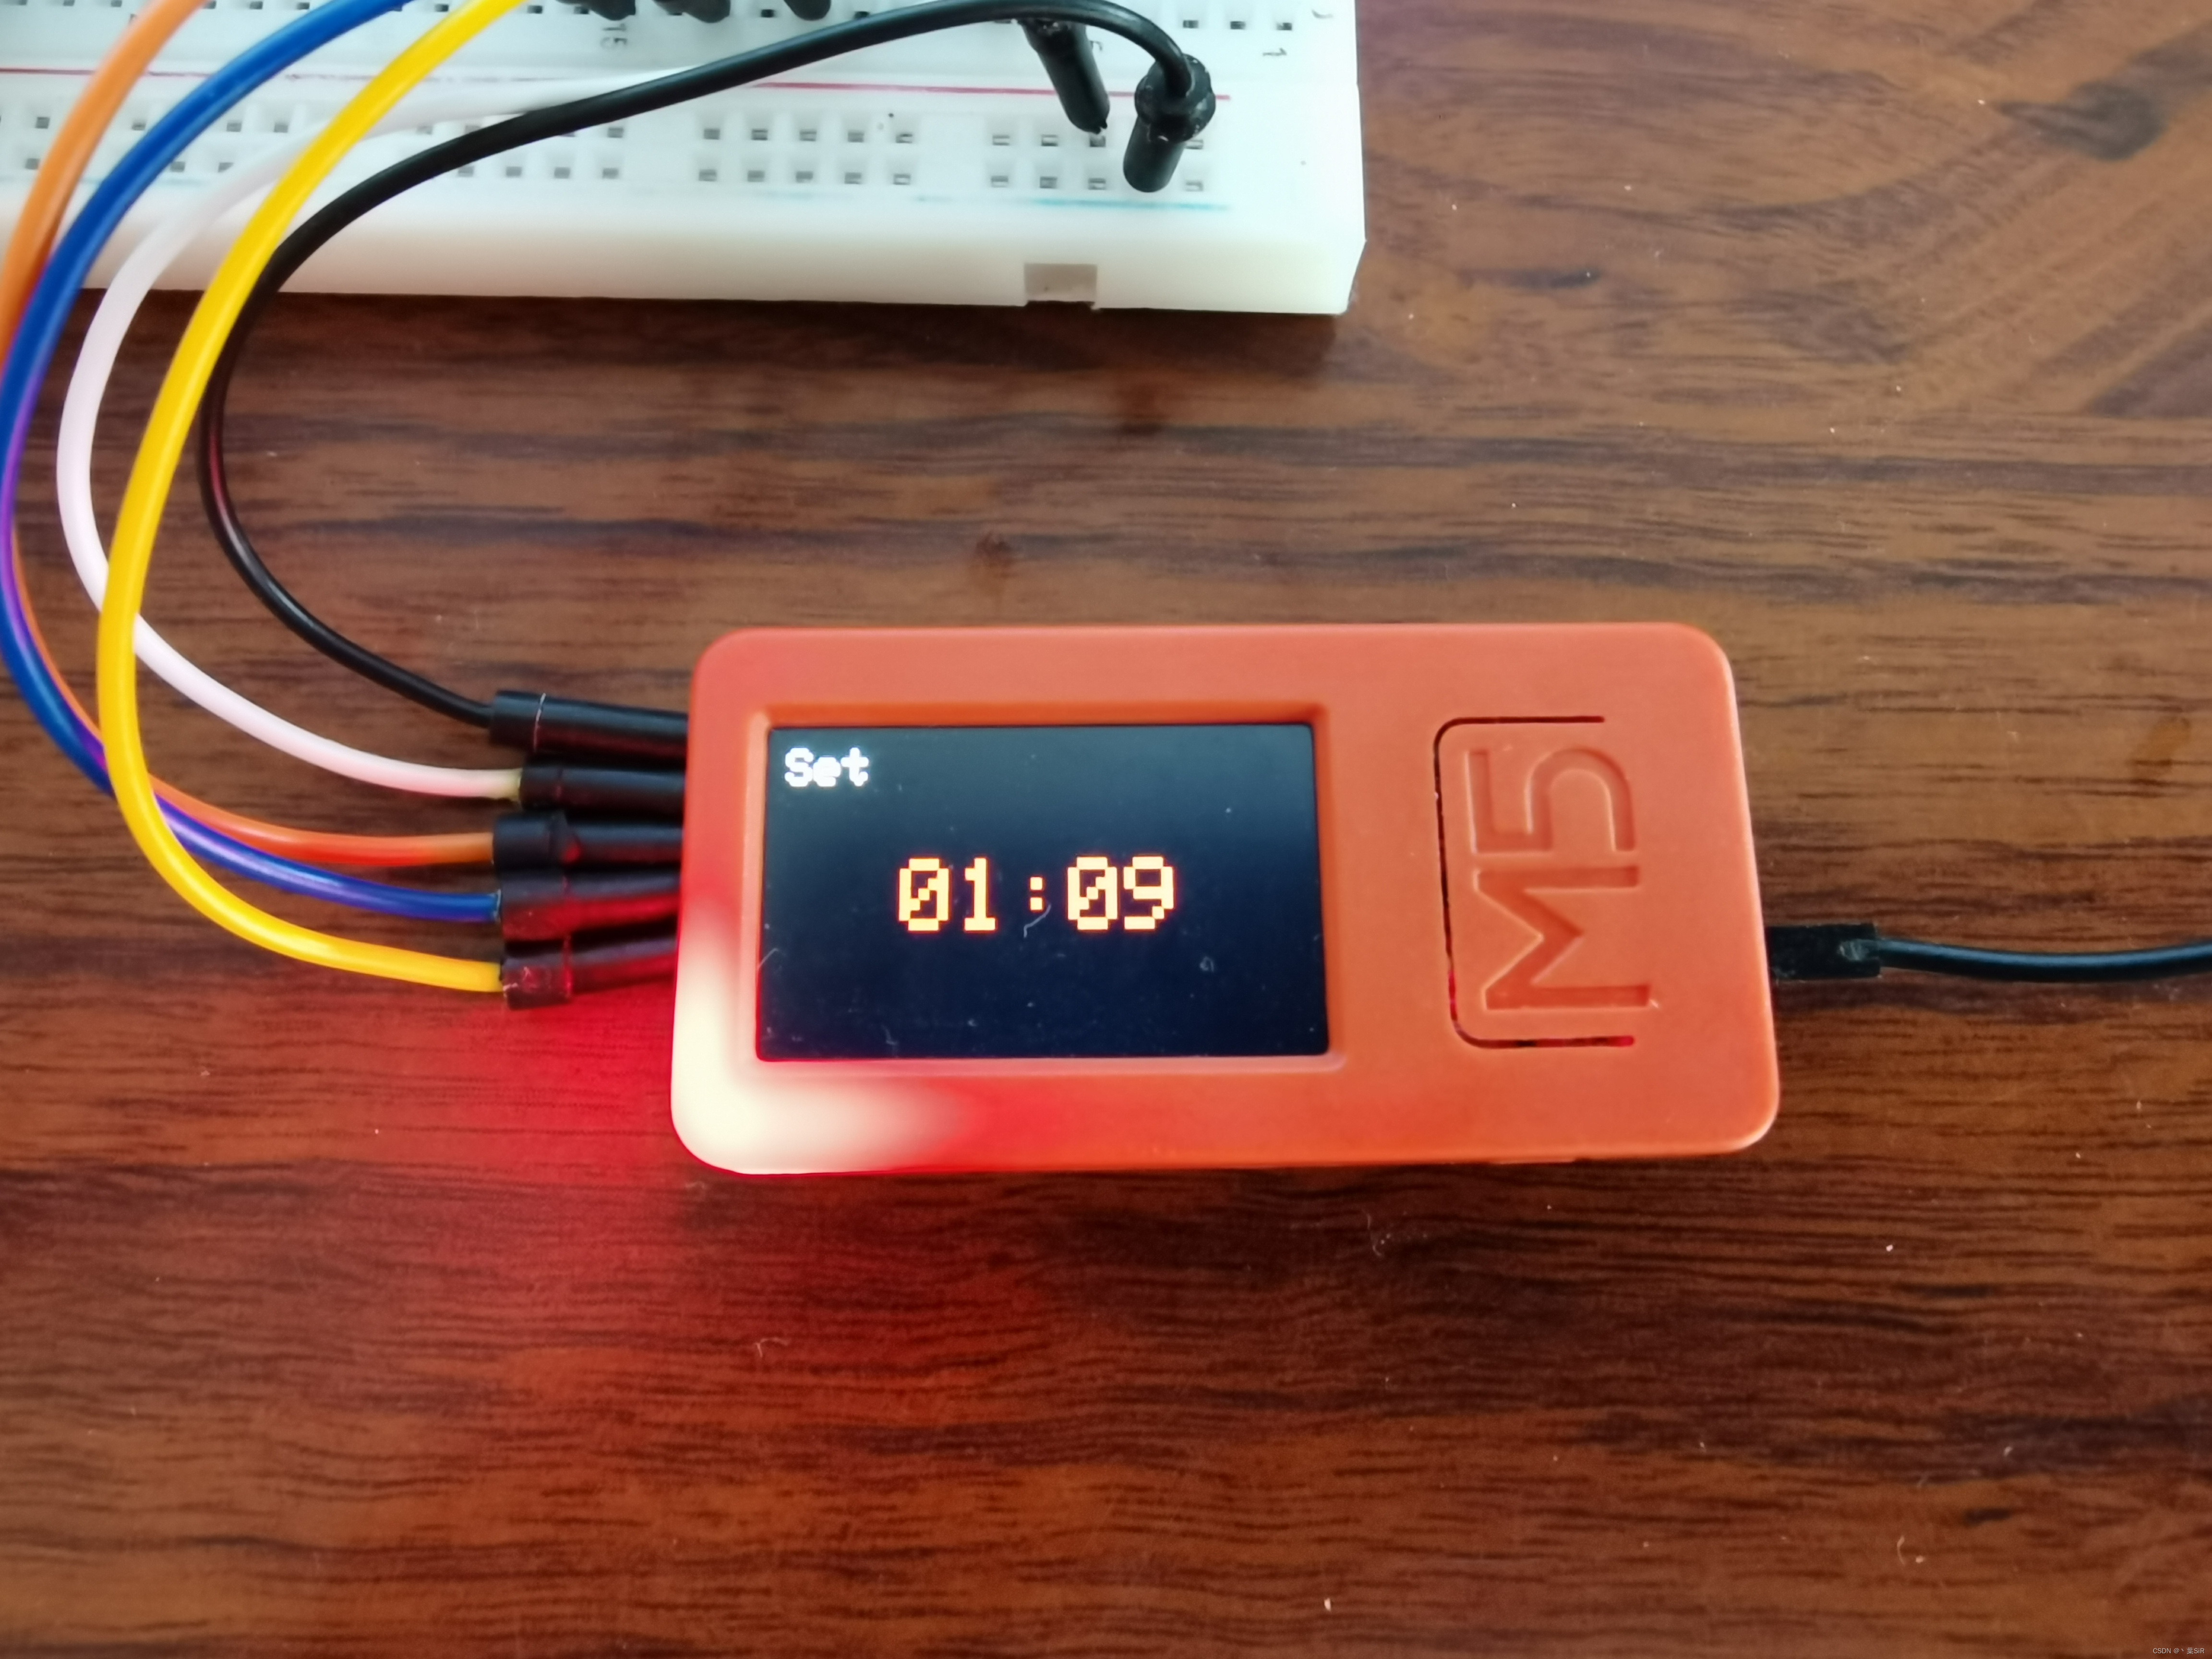
开机后,短暂显示开屏“Hello World”后,初始屏幕显示“Set”,用户可设置倒计时;
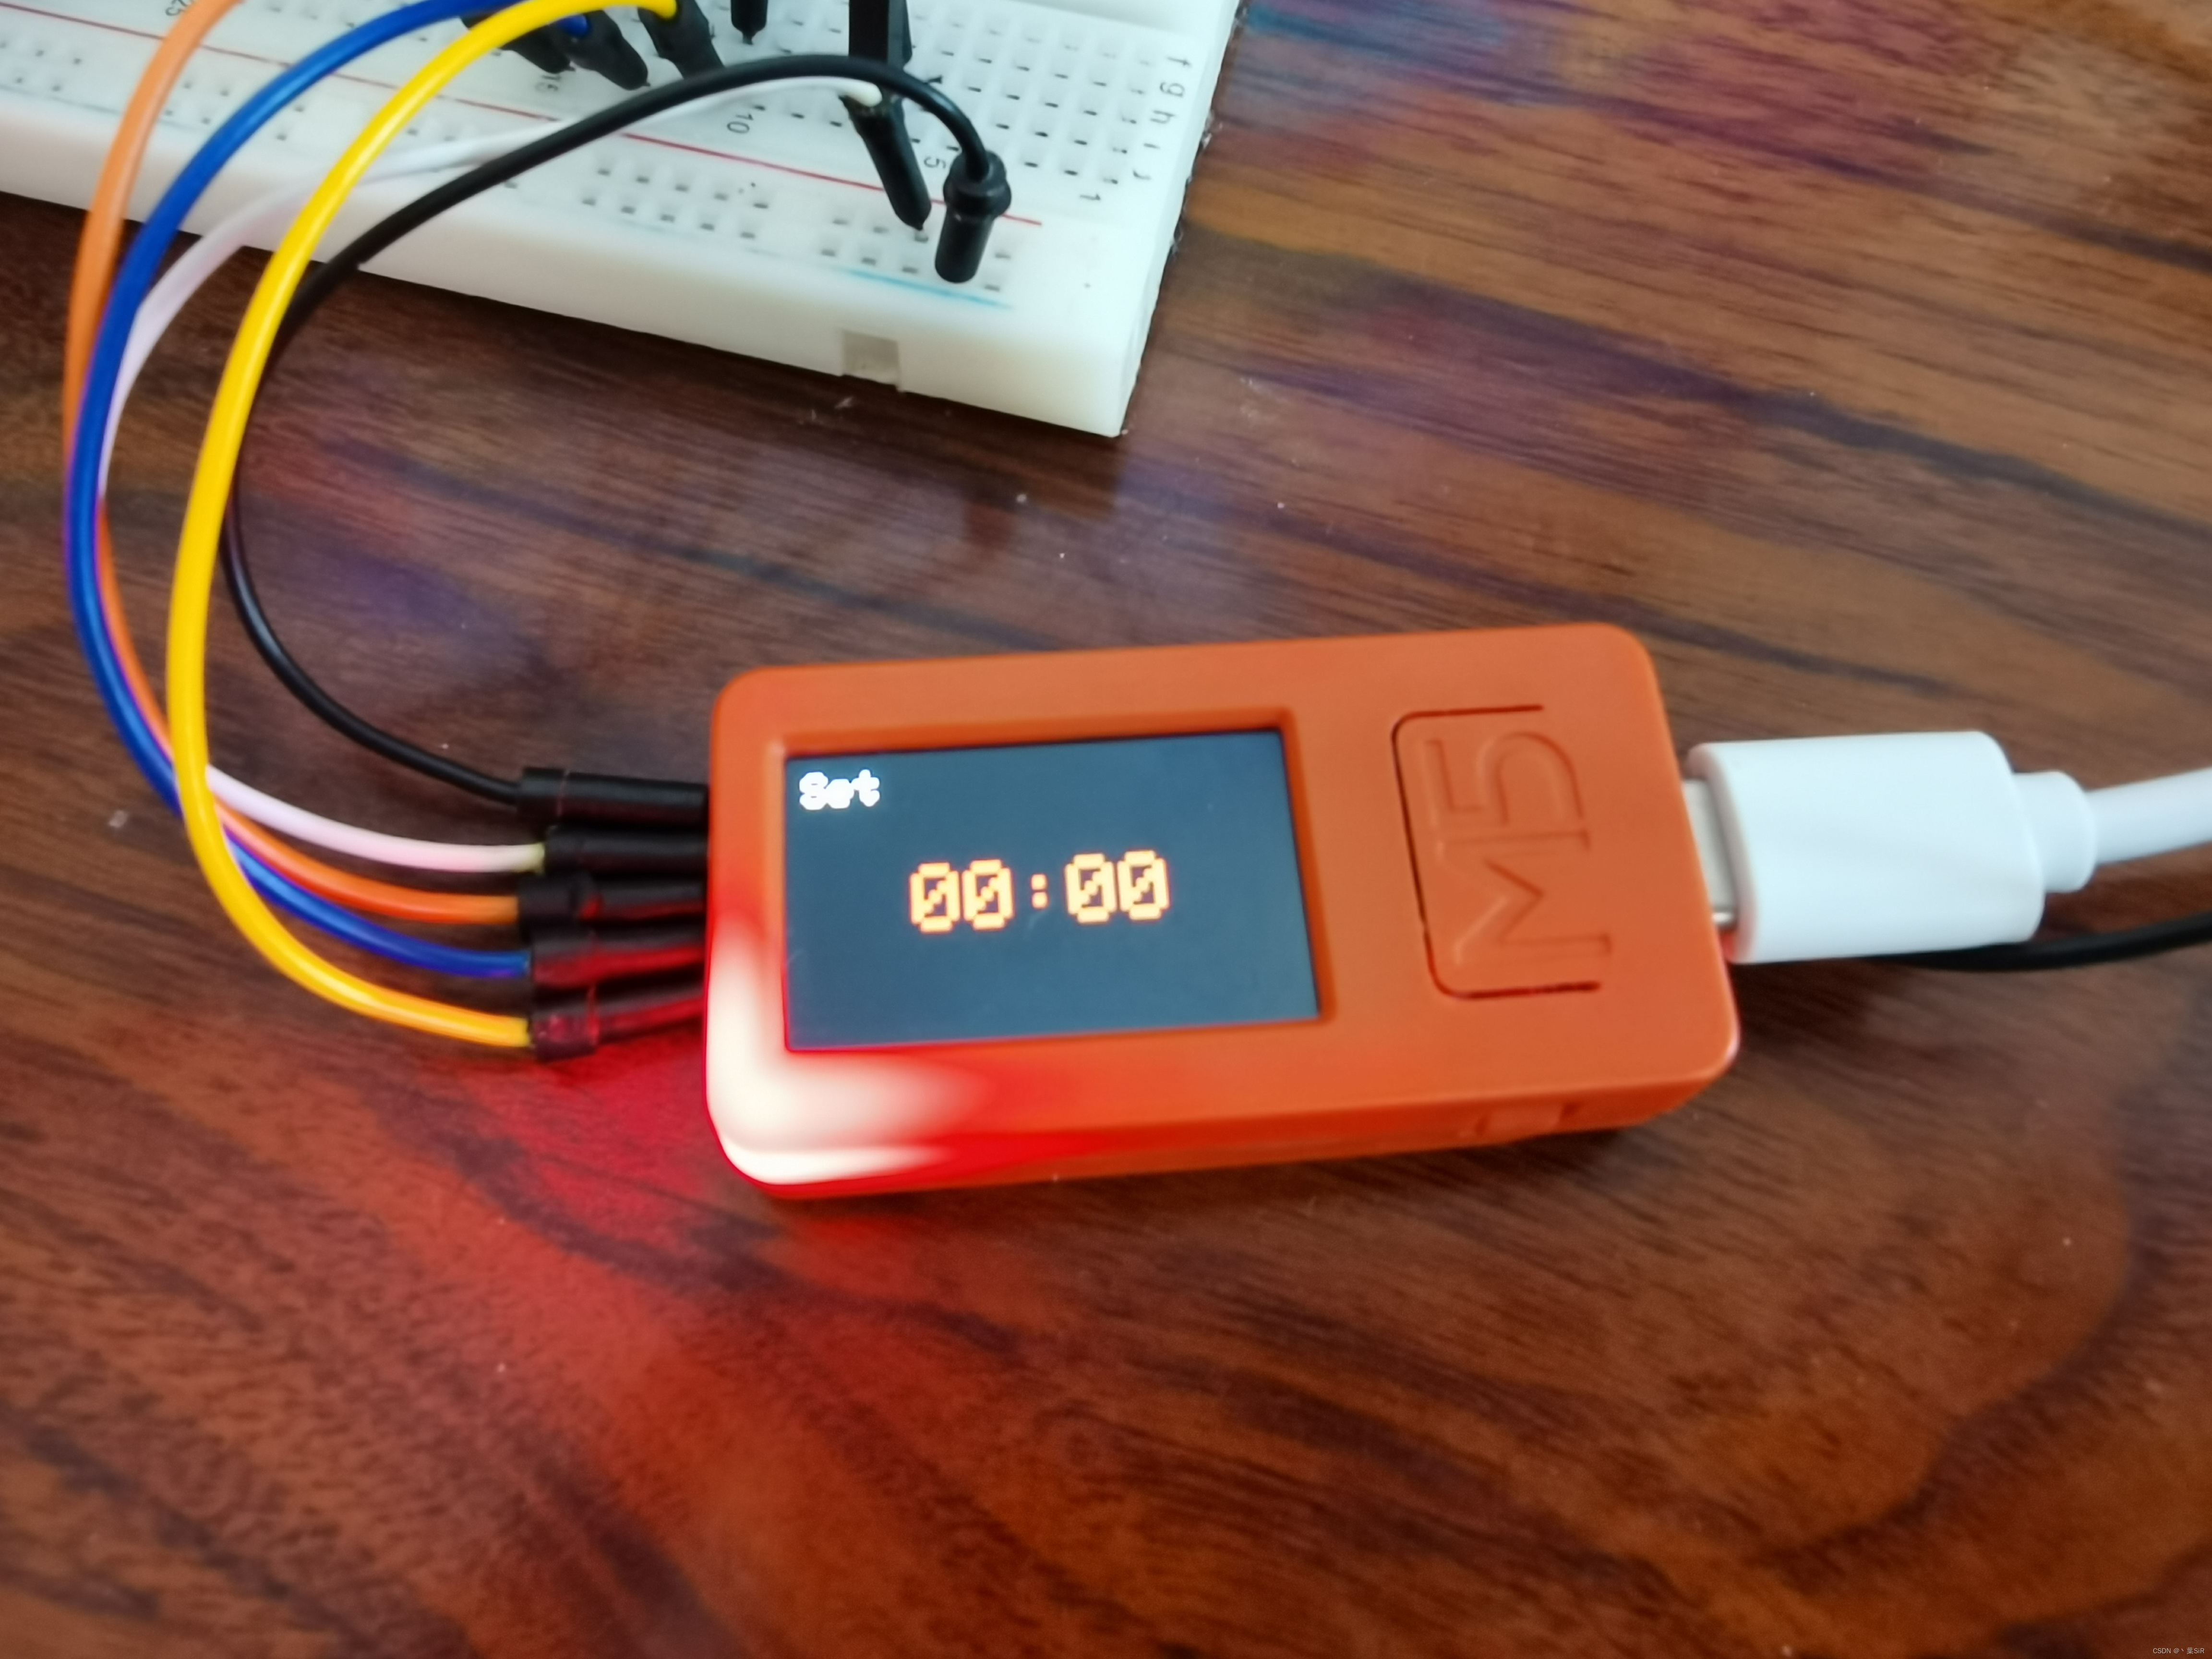
用户设定倒计时,例如1分9秒:
倒计时时,短按按键A,若此时倒计时在运行,则暂停,LCD显示“Pause”一秒;

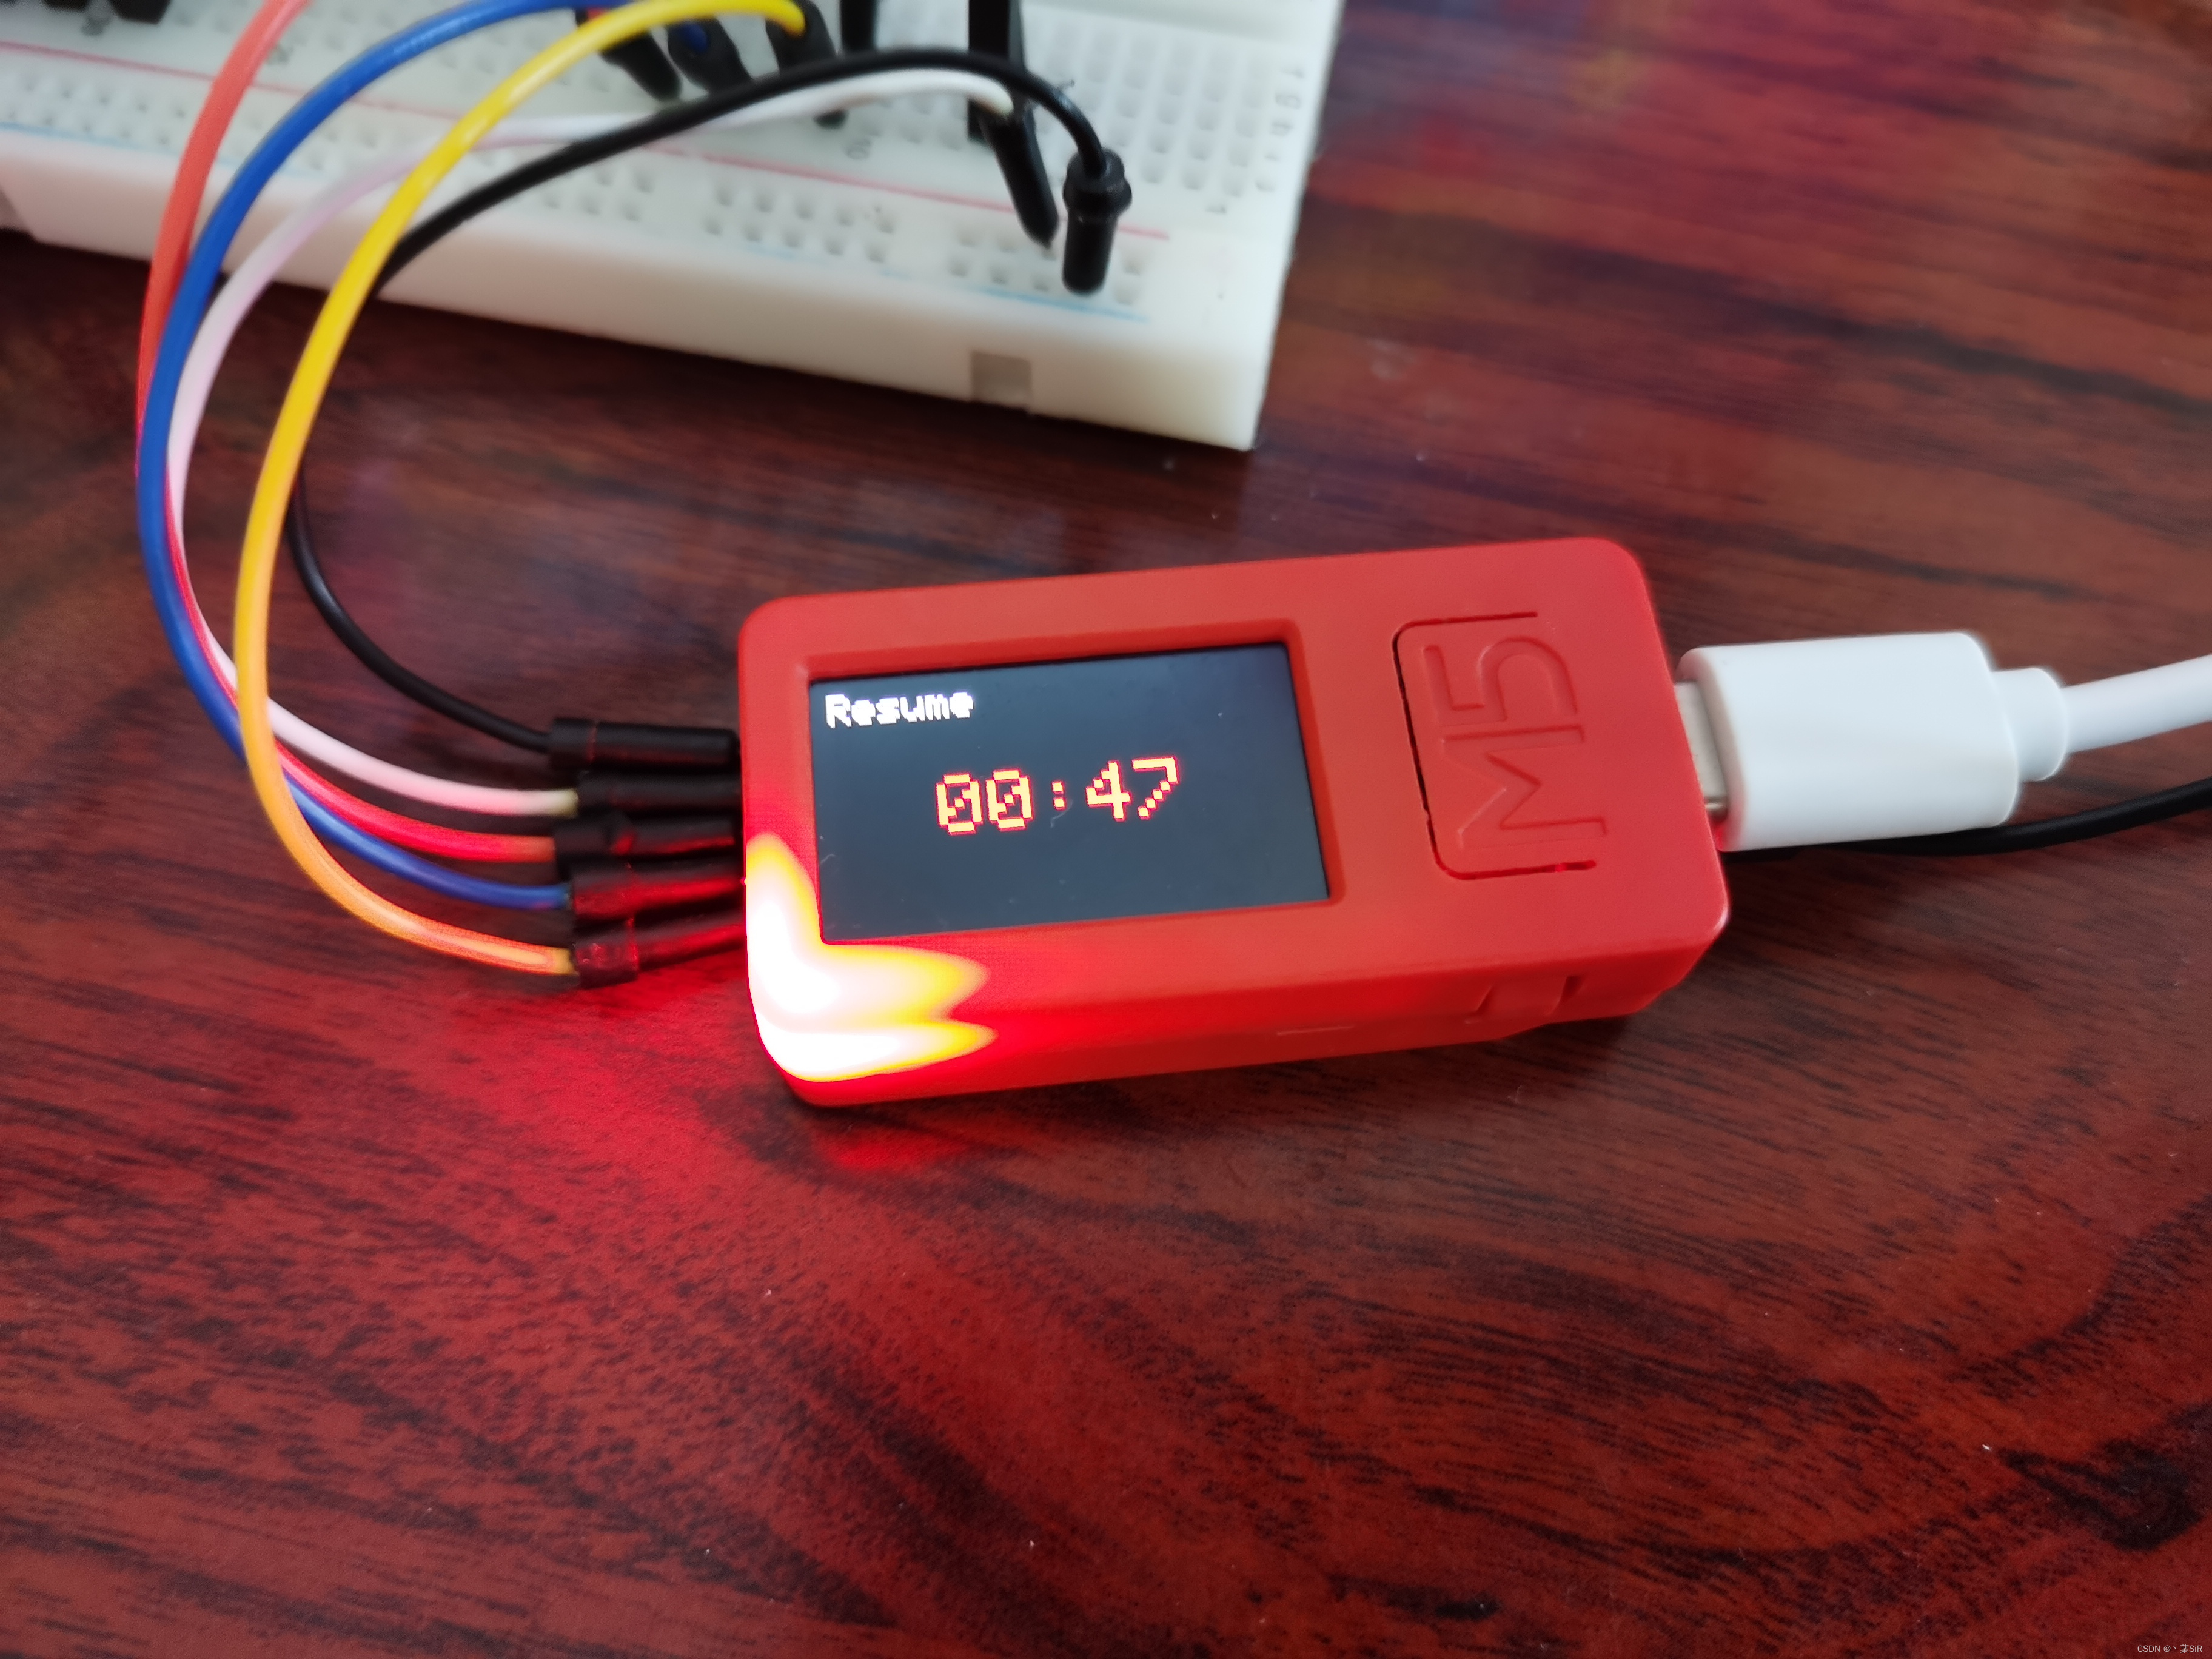
倒计时时,短按按键A,若此时倒计时暂停,则继续,LCD显示“Resume”一秒;
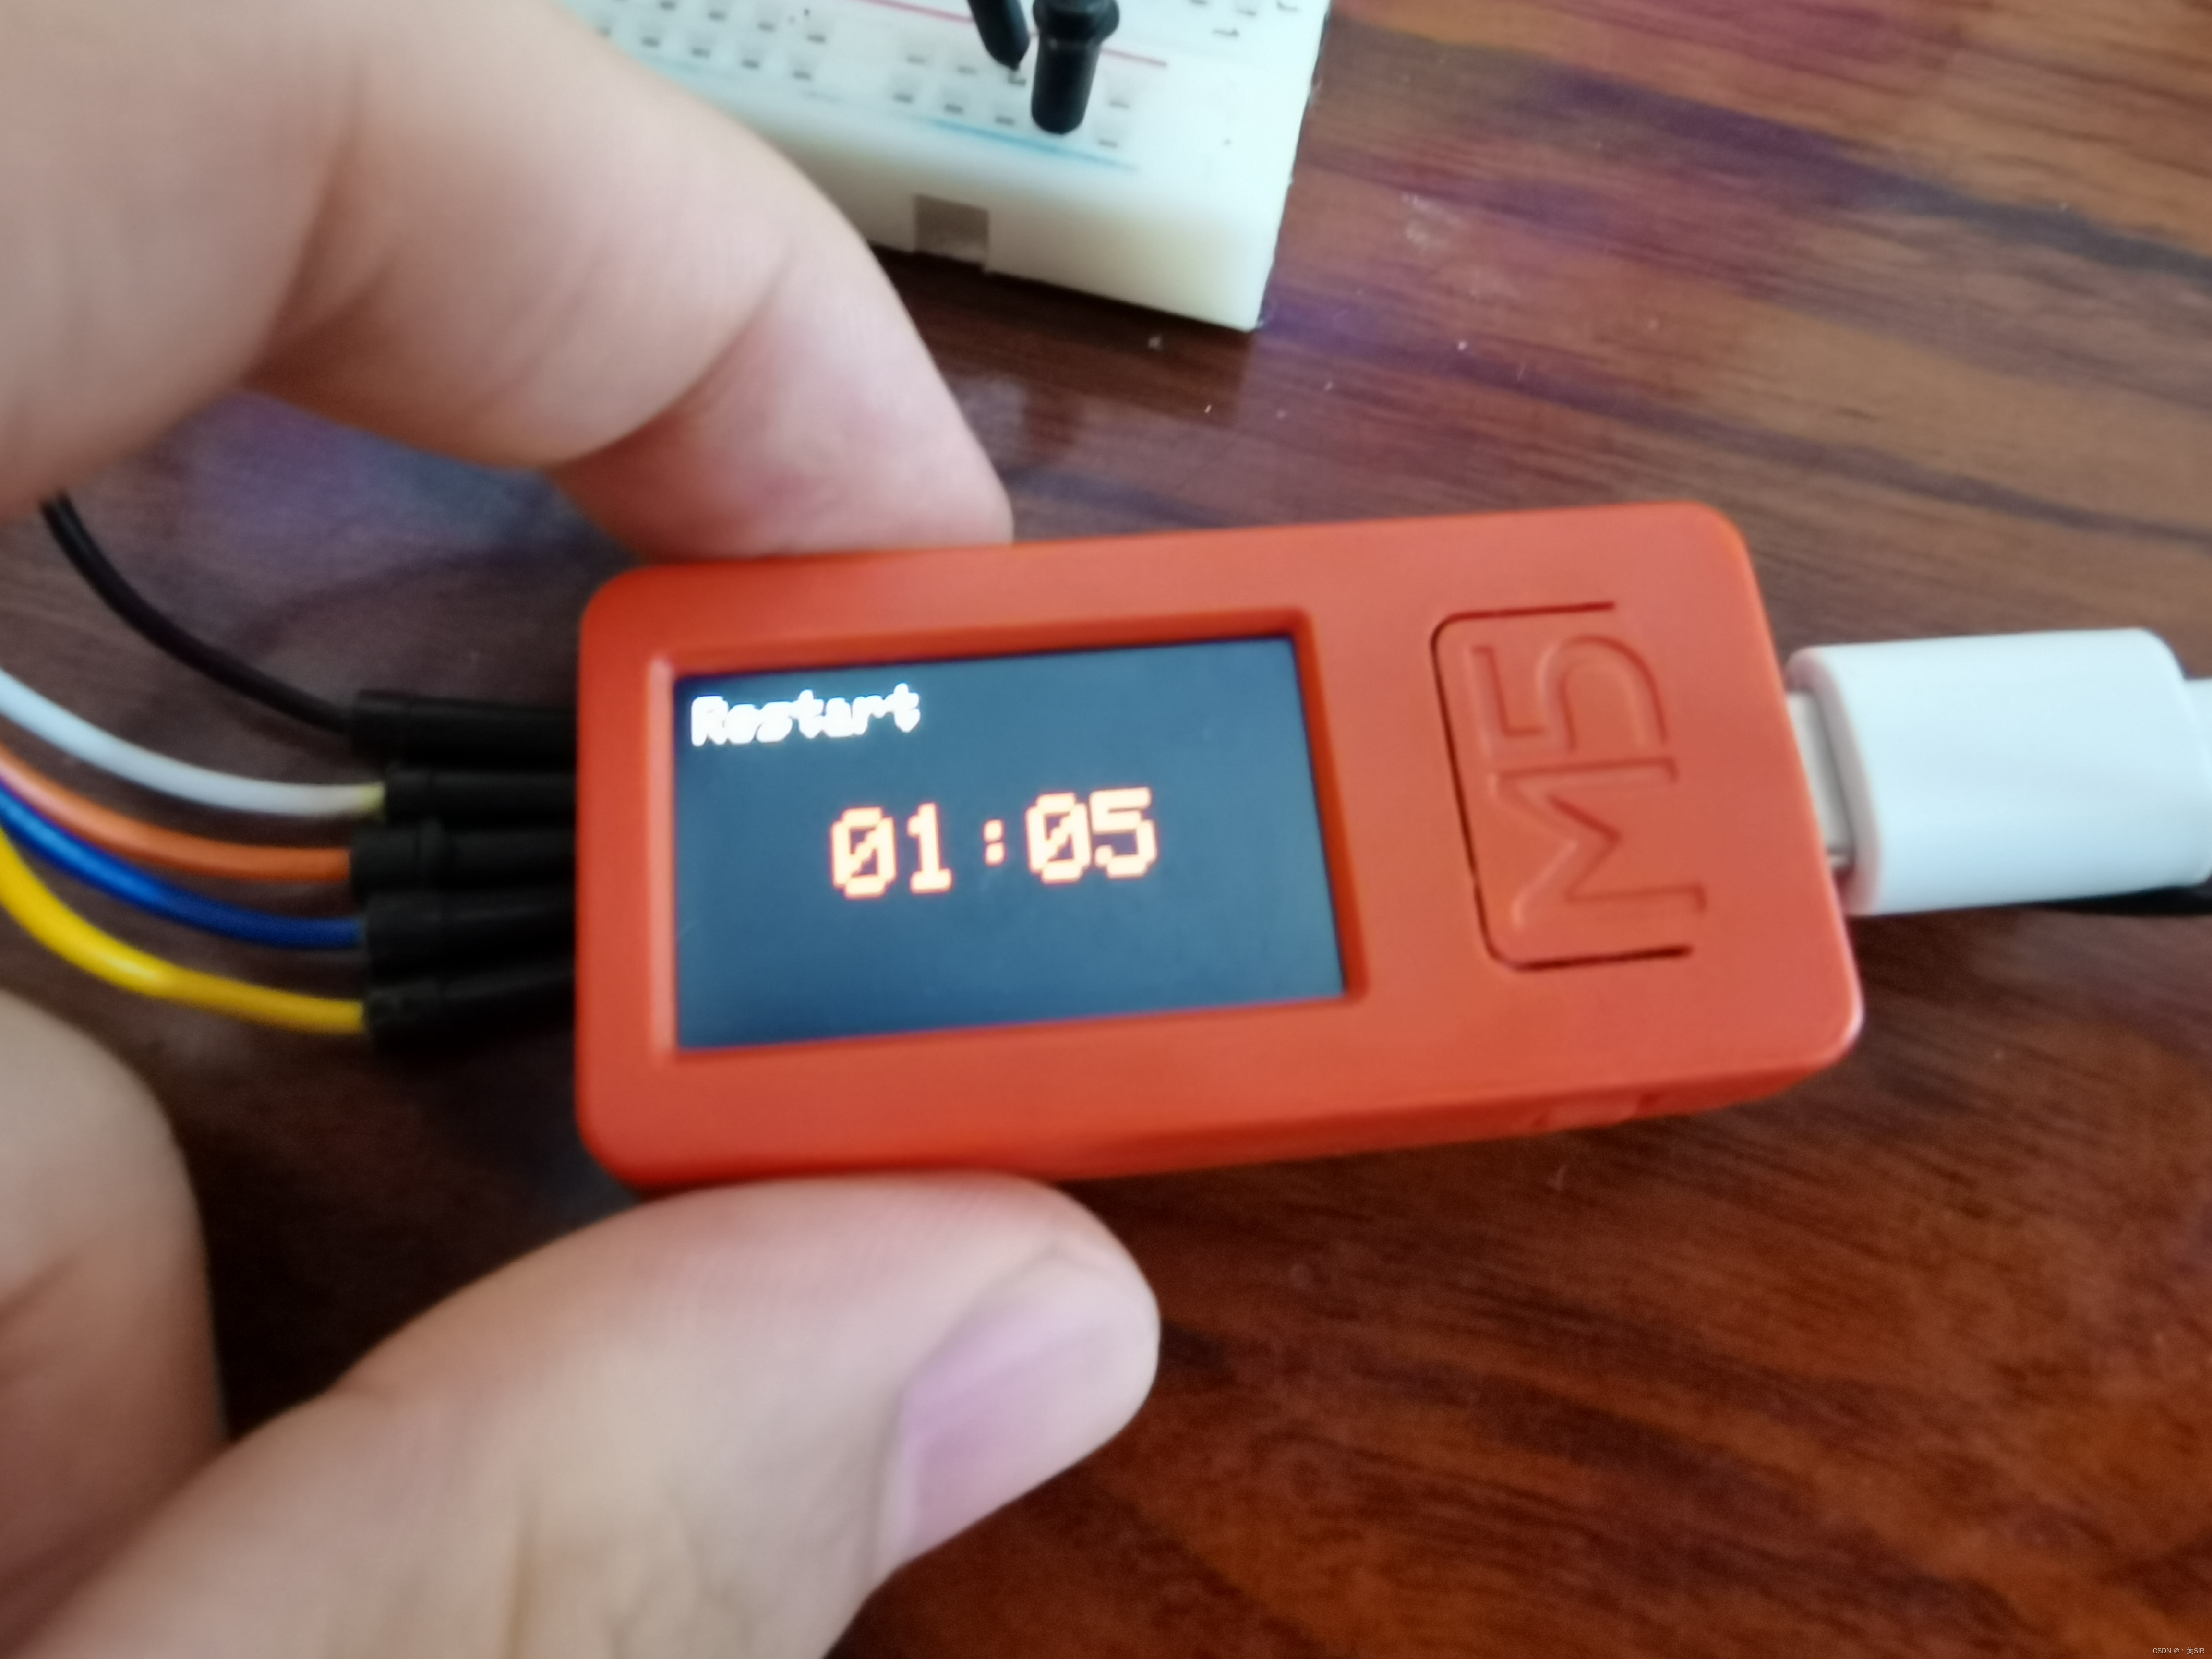
倒计时时,短按按键B,倒计时从此次设定时间重新开始,LCD显示“Restart”一秒;
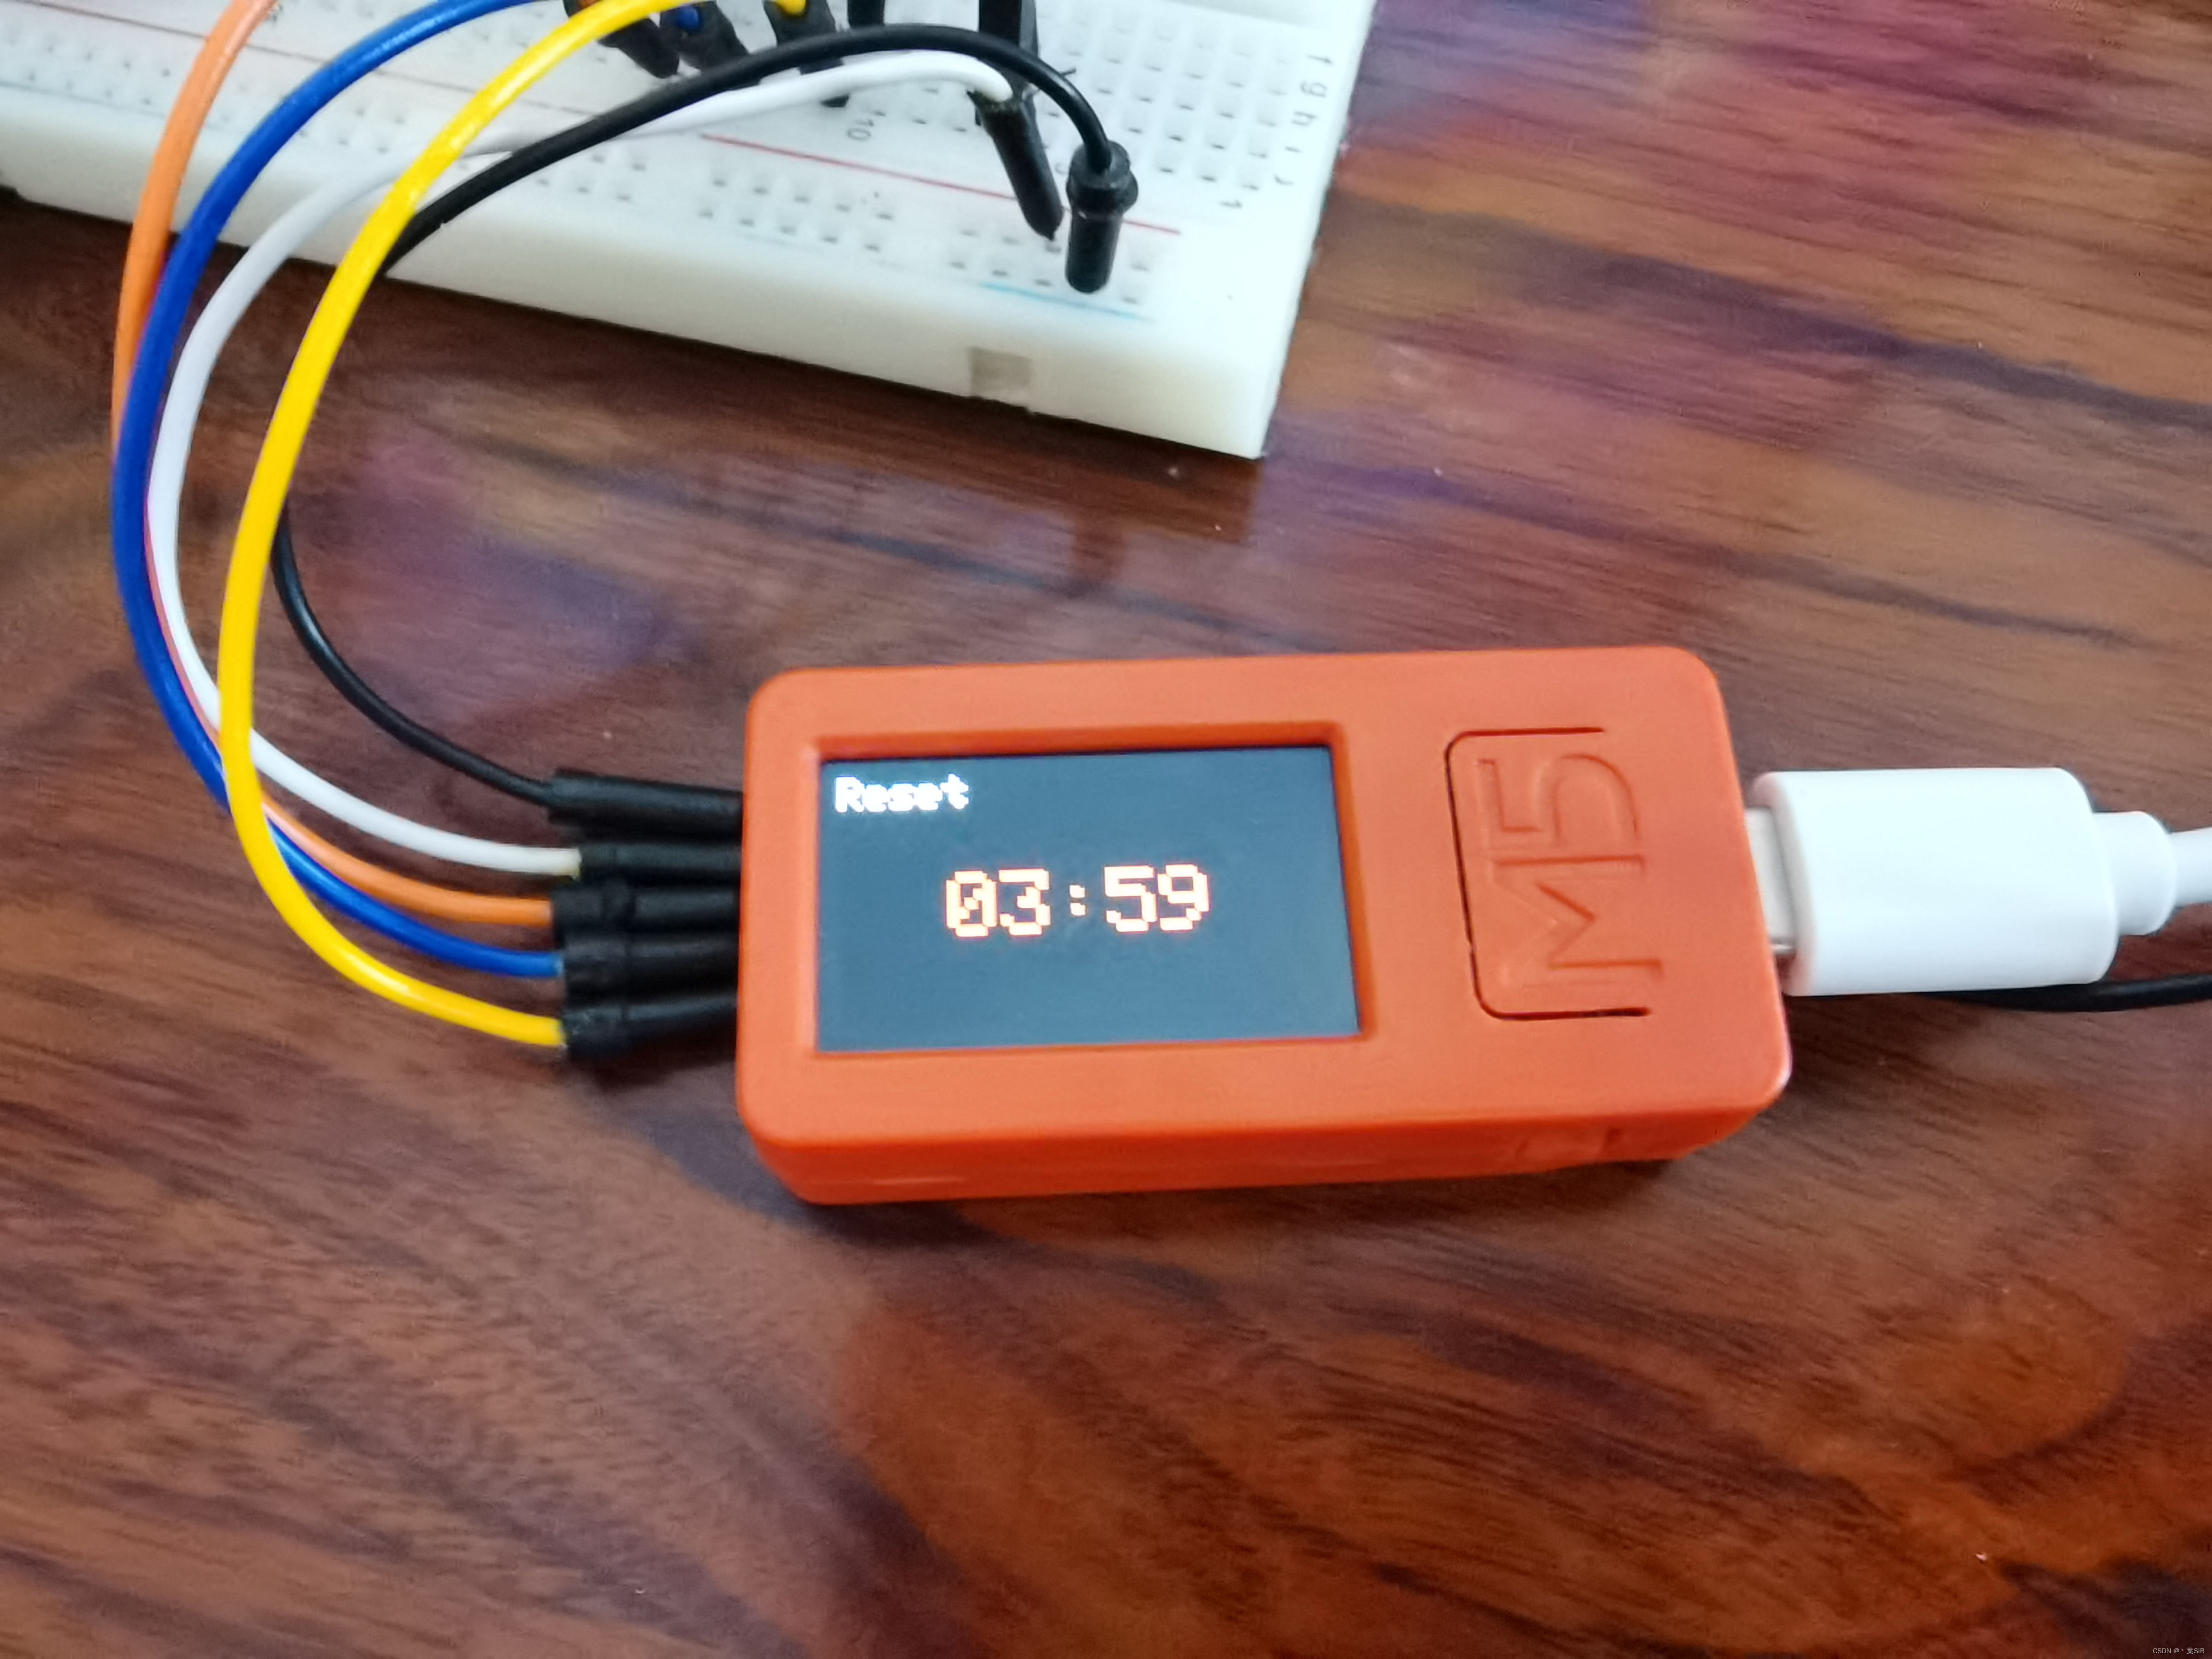
倒计时时,长按按键A,退出此次倒计时,用户可重新设置倒计时,LCD显示“Reset”一秒;
沙漏部分
该部分参见工程演示视频。
👉 B站:基于M5StickC Plus的电子沙漏(LCD+软SPI+Arduino/C++)
项目总结
此次使用M5StickC Plus完成了电子沙漏与倒计时结合的设计,实现按键控制电子沙漏工作状态、定时、在LCD上显示倒计时,同时在LED矩阵上显示沙漏滴落的动态效果,可以满足用户对倒计时、定时的多数需求。其实,加上IMU,可以实现倒置M5,沙漏回流以及倒计时增加的效果,但可能逻辑更加复杂。
M5的SDK的某些硬件资源没在其SDK或者手册中提及,比如此次工程使用了硬件定时器,全是我翻看源码才知道如何使用。
👉 CSDN:工程完整详解
👉 Github-KafCoppelia/Electronic_Sandglass_M5StickCPlus