
1 项目介绍
本项目基于” RP2350B 核心板+综合训练板“设计一款简易音乐播放器。该播放器借助综合训练板上的蜂鸣器发声,利用 LED 灯、按键以及 OLED 屏幕构建交互界面。其核心亮点在于主程序采用带优先级的时间片轮询调度结构,精准控制各功能模块:实时监测按键状态,即时响应用户操作;同步刷新 OLED 屏幕显示,呈现播放状态;稳定驱动蜂鸣器,确保音乐流畅播放。通过此设计初步体验了 RP2350B 芯片的多任务处理能力和快速响应速度,也为后续深入学习嵌入式系统开发打开了一扇门。
2 硬件资源介绍
2.1 RP2350B 芯片
RP2350B 采用“双核Arm + 双核RISC-V”的架构设计,支持可编程IO(PIO);它不仅支持通用的外设总线(I2C、SPI以及UART)访问,还可以通过适当的配置让PIO访问高速外设。本音乐播放器主要使用了RP2350B 的以下资源:
- GPIO,用于驱动LED灯;
- 硬件SPI,用于点亮OLED屏幕;
- ADC,用于按键检测;
- PWM,用于驱动蜂鸣器发声;
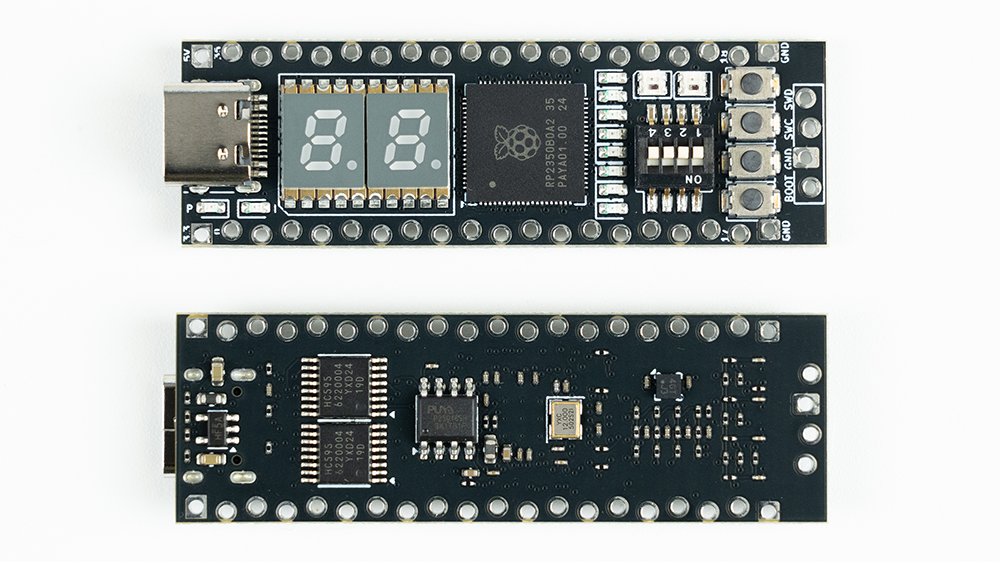
2.2 按键及LED灯
按键及LED灯都在RP2350B 核心板上。按键检测通过ADC采样模拟引脚电压实现,通过巧妙的电路设计和软件算法,实现对4个按键的实时检测。而LED驱动电路采用“Charlieplexing”结构,使用4个IO口控制8个LED灯。Charlieplexing的核心特点是使用三态逻辑(高、低输入)来显着减少引脚数并提高多路复用效率。
2.3 蜂鸣器
位于综合训练板,是音乐播放器的发声元件,通过PWM信号驱动其产生不同音调的音符。
2.4 OLED屏幕
位于综合训练板,是交互功能的主要实现载体。板载OLED屏幕使用的驱动芯片为SSD1306,本项目暂使用RP2350B的硬件SPI驱动该屏幕模组。
3 方案框图和项目设计思路
3.1 方案框图

方案框图如上图所示,主要包括按键控制模块、LED显示模块、OLED显示模块以及音乐播放模块。
3.2项目总体设计思路
设计思路主要按照硬件资源展开,下面逐一介绍。
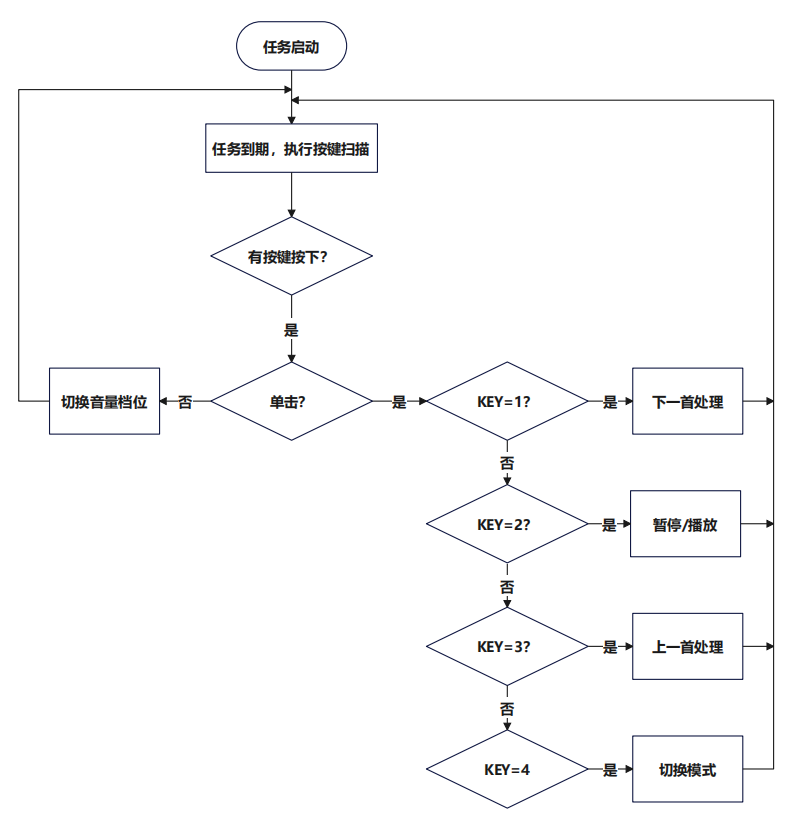
3.2.1 使用按键切换歌曲、暂停播放和调节音量
正对核心板,从左到右,按键以此编号为KEY4-KEY3-KEY2-KEY1,具体对应的功能如下:
KEY4 单击:切换播放模式,模式支持三种[单曲循环->顺序播放->随机播放],初始模式为单曲循环。每单击一次,就切换到下一个模式,比如初始状态下,单击为顺序播放,再单击为随机播放,再单击就回到单曲循环,依此类推。
KEY3 单击:播放上一首歌曲。在单曲或顺序播放模式下,如果当前歌曲为第一首歌曲,单击此按键会切换到最后一首歌曲。暂停状态下,单击此按键会自动结束暂停状态,开始播放音乐;在随机播放模式下,则随机选择下一首歌曲。
KEY2 单击:暂停/播放当前歌曲。
KEY1 单击:播放下一首歌曲。在单曲或顺序播放模式下,如果当前歌曲为最后一首歌曲,单击此按键会切换到第一首歌曲。暂停状态下,单击此按键会自动结束暂停状态,开始播放音乐;在随机播放模式下,则随机选择下一首歌曲。
KEY1-KEY4 双击 :切换音量档位。KEY4最高档,KEY3中间档,KEY2最低档,KEY1静音档。
3.2.2 使用LED灯,向用户反馈按键状态
使用核心板上的D3-D10,呈现8个按键状态。正对核心板,从左到右,LED以此编号为D10-D9 ... D3,对应关系如下:
D10亮,双击KEY4,音量切换到最高档;D9亮,双击KEY3,音量切换到中间档;D8亮,双击KEY2,音量切换到最低档;D7亮,双击KEY1,音量切换到静音档。
D6亮,单击KEY4,模式切换;D5亮,单击KEY3,播放上一首;D4亮,单击KEY2,暂停/播放;D3亮,单击KEY1,播放下一首。
3.2.3 使用OLED屏幕显示歌曲名等
在OLED屏幕上划分两个区域,分别显示当前的播放模式和正在播放的歌曲名(或暂停状态);
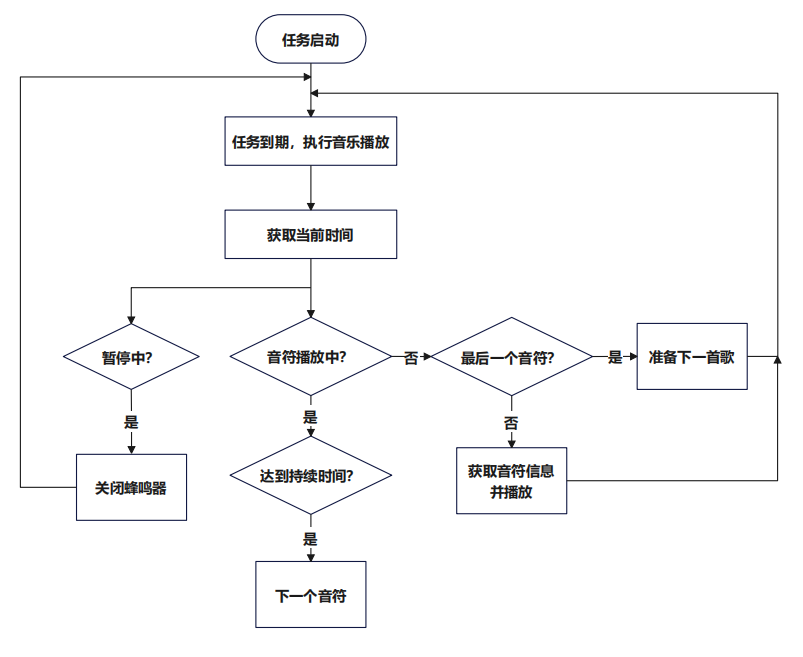
3.2.4 使用蜂鸣器播放歌曲
根据当前播放模式和歌曲编号、音符编号,音符持续时间等信息,播放音乐。
4 软件流程图和关键代码介绍
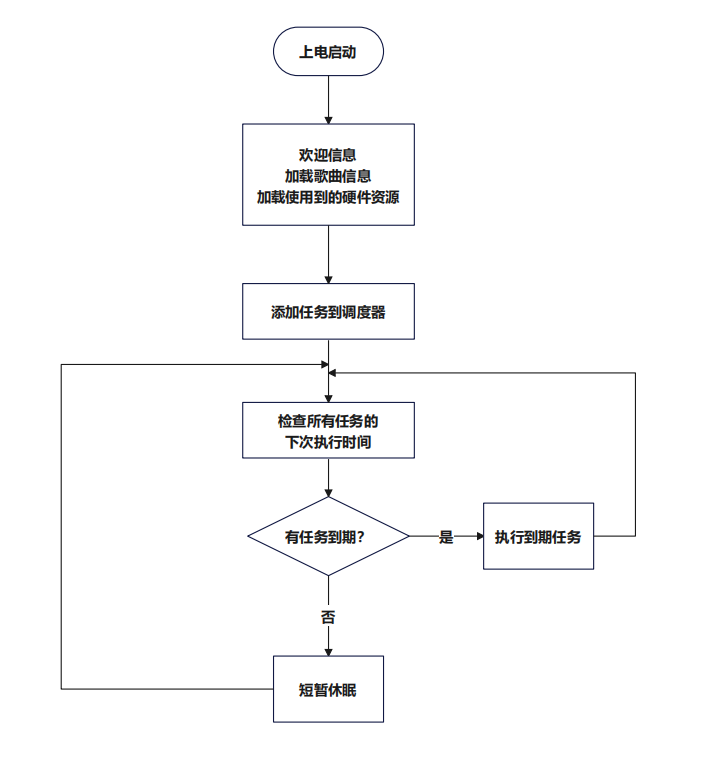
4.1 软件流程图
主程序流程图如下:
按键处理流程图:
音乐播放流程图:
4.2 时间片调度器代码
class PreemptiveScheduler:
    def __init__(self):
        self.tasks = []  # 格式: (task_func, interval, next_run_time, priority)
        self.priority_levels = {}  # 优先级映射表

    def add_task(self, task_func, interval, priority=5):
        """添加任务到调度器

        Args:
            task_func (function): 要执行的任务函数
            interval (float): 任务执行间隔(秒)
            priority (int): 任务优先级(1-10,1为最高)
        """
        # 初始化下一次运行时间为当前时间
        next_run_time = time.monotonic()
        self.tasks.append((task_func, interval, next_run_time, priority))

        # 更新优先级映射
        self.priority_levels[priority] = self.priority_levels.get(priority, []) + [task_func]

    def run(self):
        """运行调度器(支持优先级)"""
        while True:
            current_time = time.monotonic()
            executed = False

            # 按优先级从高到低执行任务
            for priority in sorted(self.priority_levels.keys()):
                for task in self.tasks:
                    task_func, interval, next_run_time, task_priority = task

                    # 检查任务是否属于当前优先级且需要执行
                    if task_priority == priority and current_time >= next_run_time:
                        # 执行任务
                        task_func()

                        # 更新下一次运行时间
                        index = self.tasks.index(task)
                        self.tasks[index] = (task_func, interval, current_time + interval, task_priority)

                        executed = True

            # 如果没有任务执行,短暂休眠
            if not executed:
                time.sleep(0.001)
4.3 核心任务代码
主要包括按键切换、LED更新及音乐播放任务。
按键切换代码,按照3.2.1的思路编写代码:
# 任务1: 按键切换
def task_key_detection():
    global playing, paused, current_song_index, play_mode, volume
    global current_note_playing, note_index
    click_count, current_key = adc_key.key_event_handler()

    if click_count != 0:
        led_state['last_event_time'] = time.monotonic()

        if current_key == 1 and click_count == 1:
            # 单击: 点亮LED 3-6
            led_state['active_led'] = current_key + 2
            print(f"单击: 按键{current_key} -> LED{current_key+2}")
            # 立即停止当前播放
            buzzer.duty_cycle = 0
            current_note_playing = False

            # 播放
            playing = True
            paused = False
            current_song_index = (current_song_index + 1) % len(songs)
            if play_mode == 2:#随机模式,下一首也随机
                current_song_index = random.randint(0, len(songs) - 1)
            note_index = 0
            print(f"Switch to next song: {songs[current_song_index]['name']} >>>>>>>>>>>>>>>>>>>>>>>")
            text_area.text = songs[current_song_index]['name']
        if current_key == 2 and click_count == 1:
            # 单击: 点亮LED 3-6
            led_state['active_led'] = current_key + 2
            print(f"单击: 按键{current_key} -> LED{current_key+2}")
            # 播放
            paused = not paused
            print("Paused" if paused else "Playing")

            if paused:
                buzzer.duty_cycle = 0
                current_note_playing = False

                playing = False
                text_area.text = "暂停"
            if not paused:
                playing = True
                text_area.text = songs[current_song_index]['name']
        if current_key == 3 and click_count == 1:
            # 单击: 点亮LED 3-6
            led_state['active_led'] = current_key + 2
            print(f"单击: 按键{current_key} -> LED{current_key+2}")

            # 立即停止当前播放
            buzzer.duty_cycle = 0
            current_note_playing = False

            # 重置状态
            playing = True
            paused = False
            current_song_index = (current_song_index - 1) % len(songs)
            if play_mode == 2:#随机模式,上一首也随机
                current_song_index = random.randint(0, len(songs) - 1)
            note_index = 0
            print(f"Switch to previous song: {songs[current_song_index]['name']} <<<<<<<<<<<<<<<<<<<<<<<<<<<")
            text_area.text = songs[current_song_index]['name']
        if current_key == 4 and click_count == 1:
            # 单击: 点亮LED 3-6
            led_state['active_led'] = current_key + 2
            print(f"单击: 按键{current_key} -> LED{current_key+2}")
            play_mode = (play_mode + 1) % 3
            print(f"Switched to play mode {play_mode}: ", end="")
            if play_mode == 0:
                print("Single Loop")
                mode_area.text = "单曲"
            elif play_mode == 1:
                print("Order Play")
                mode_area.text = "列表"
            else:
                print("Random Play")
                mode_area.text = "随机"
        if current_key != None and click_count == 2:
            # 单击: 点亮LED 3-6
            volume = volume_levels[current_key-1]
            led_state['active_led'] = current_key + 6
            print(f"双击: 按键{current_key} -> LED{current_key+6}")
    else:
        # 按键释放后1秒自动熄灭LED
        if time.monotonic() - led_state['last_event_time'] > 1.0:
            led_state['active_led'] = None
LED更新代码,根据按键逻辑更新状态,LED更新函数根据状态更新LED亮、灭:
# 任务2: LED状态更新
def task_led_update():
    # 1. 关闭所有LED(确保完全关闭)
    step_led.light_off_all()

    # 2. 如果有活动LED,点亮它
    if led_state['active_led'] is not None:
        step_led.light_on_one(led_state['active_led'])
音乐播放代码,根据播放模式、歌曲编号、音符编号及音符持续时间等信息,播放音乐:
# 任务3:播放音乐 (非阻塞版本)
def task_music_player_noblocking():
    global volume
    global playing, paused, note_index, current_song_index, play_mode
    global current_note_start_time, current_note_duration, current_note_playing

    current_time = time.monotonic()

    # 1. 停止当前音符(如果需要)
    if current_note_playing:
        # 检查是否达到音符持续时间
        if current_time - current_note_start_time >= current_note_duration:
            # 停止当前音符
            buzzer.duty_cycle = 0
            current_note_playing = False

            # 准备播放下一个音符
            note_index += 1

    # 2. 处理歌曲切换后的重置
    if not playing or paused:
        # 确保蜂鸣器停止
        buzzer.duty_cycle = 0
        current_note_playing = False
        return

    # 3. 播放新音符
    if not current_note_playing:
        # 检查是否还有音符要播放
        if note_index >= len(songs[current_song_index]['melody']):
            # 歌曲结束处理
            handle_song_end()
            return

        tone = songs[current_song_index]['melody'][note_index]
        duration = songs[current_song_index]['durations'][note_index]

        if tone in tones:
            # 开始播放新音符
            buzzer.frequency = tones[tone]
            buzzer.duty_cycle = volume

            # 更新状态
            current_note_start_time = current_time
            current_note_duration = duration
            current_note_playing = True

            # 调试信息
            print(f"播放: {tone} ({duration}s) [歌曲: {songs[current_song_index]['name']}]")
        else:
            print(f"音调 {tone} 不存在")
            note_index += 1  # 跳过无效音调
歌曲结束处理
# 处理歌曲结束
def handle_song_end():
    global note_index, current_song_index, text_area

    print(f"歌曲 {songs[current_song_index]['name']} 播放完成======================")

    # 根据播放模式选择下一首
    if play_mode == 0:  # 单曲循环
        note_index = 0
    elif play_mode == 1:  # 顺序播放
        current_song_index = (current_song_index + 1) % len(songs)
        note_index = 0
        text_area.text = songs[current_song_index]['name']
    elif play_mode == 2:  # 随机播放
        current_song_index = random.randint(0, len(songs) - 1)
        note_index = 0
        text_area.text = songs[current_song_index]['name']

    print(f"下一首: {songs[current_song_index]['name']}")
4.4 按键扫描代码
import time
import analogio
import board

class ADCKey:
    def __init__(self, pin, key_ranges, sample_num=5):
        self.adc = analogio.AnalogIn(pin)
        self.key_ranges = key_ranges
        self.sample_num = sample_num
        self.adc_samples = []
        self.last_key = None
        self.last_press_time = 0
        self.last_release_time = 0
        self.click_count = 0
        self.pressed_key = None
        self.double_click_timeout = 0.5  # 双击时间窗口(单位:秒)

    def slide_avg_filter(self, new_sample):
        self.adc_samples.append(new_sample)
        if len(self.adc_samples) > self.sample_num:
            self.adc_samples.pop(0)
        return sum(self.adc_samples) // len(self.adc_samples)

    def key_judge(self):
        adc_sample = self.adc.value
        filtered_adc = self.slide_avg_filter(adc_sample)

        for i, (lower, upper) in enumerate(self.key_ranges):
            if lower <= filtered_adc <= upper:
                return i + 1
        return None

    def key_event_handler(self):
        current_key = self.key_judge()
        current_time = time.monotonic()
        event = None

        # 按键按下事件
        if current_key is not None and self.pressed_key is None:
            self.pressed_key = current_key
            self.last_press_time = current_time
            return 0, None  # 按下时不立即返回事件

        # 按键释放事件
        if current_key is None and self.pressed_key is not None:
            # 计算按键持续时间
            press_duration = current_time - self.last_press_time

            # 计算与上次释放的时间间隔
            release_interval = current_time - self.last_release_time

            # 双击检测
            if release_interval < self.double_click_timeout and self.pressed_key == self.last_key:
                self.click_count = 2
            else:
                self.click_count = 1

            event = (self.click_count, self.pressed_key)
            self.last_key = self.pressed_key
            self.last_release_time = current_time
            self.pressed_key = None
            return event

        return 0, None
4.5 LDE驱动代码
import board
import digitalio

# 定义4个IO口
io_pins = [
    board.GP27,
    board.GP26,
    board.GP25,
    board.GP24
]

#例化IO口
ios = [digitalio.DigitalInOut(pin) for pin in io_pins]

# 定义每个LED对应的高电平和低电平IO口索引
led_config = {
    3: {"high": 0, "low": 1},  # D3: io_pins[0] 高电平,io_pins[1] 低电平
    4: {"high": 1, "low": 2},  # D4: io_pins[1] 高电平,io_pins[2] 低电平
    5: {"high": 2, "low": 3},  # D5: io_pins[2] 高电平,io_pins[3] 低电平
    6: {"high": 1, "low": 0},  # D6: io_pins[1] 高电平,io_pins[0] 低电平
    7: {"high": 2, "low": 1},  # D7: io_pins[2] 高电平,io_pins[1] 低电平
    8: {"high": 3, "low": 2},  # D8: io_pins[3] 高电平,io_pins[2] 低电平
    9: {"high": 1, "low": 3},  # D9: io_pins[1] 高电平,io_pins[3] 低电平
    10: {"high": 3, "low": 1}  # D10: io_pins[3] 高电平,io_pins[1] 低电平
}

def init_ios():
    """初始化所有IO口为输入模式"""
    for io in ios:
        io.switch_to_input()

def light_on_one(led_num):
    """点亮指定LED灯"""
    init_ios()  # 先熄灭所有LED灯
    if led_num in led_config:
        high_index = led_config[led_num]["high"]
        low_index = led_config[led_num]["low"]
        # 设置高电平IO口
        ios[high_index].switch_to_output(value=True)
        # 设置低电平IO口
        ios[low_index].switch_to_output(value=False)

def light_off_one(led_num):
    """点亮指定LED灯"""
    init_ios()  # 先熄灭所有LED灯
    if led_num in led_config:
        high_index = led_config[led_num]["high"]
        low_index = led_config[led_num]["low"]
        # 设置高电平IO口
        ios[high_index].switch_to_output(value=False)
        # 设置低电平IO口
        ios[low_index].switch_to_output(value=False)

def light_off_all():
    """熄灭所有LED灯"""
    init_ios()
5 实物功能展示图及说明
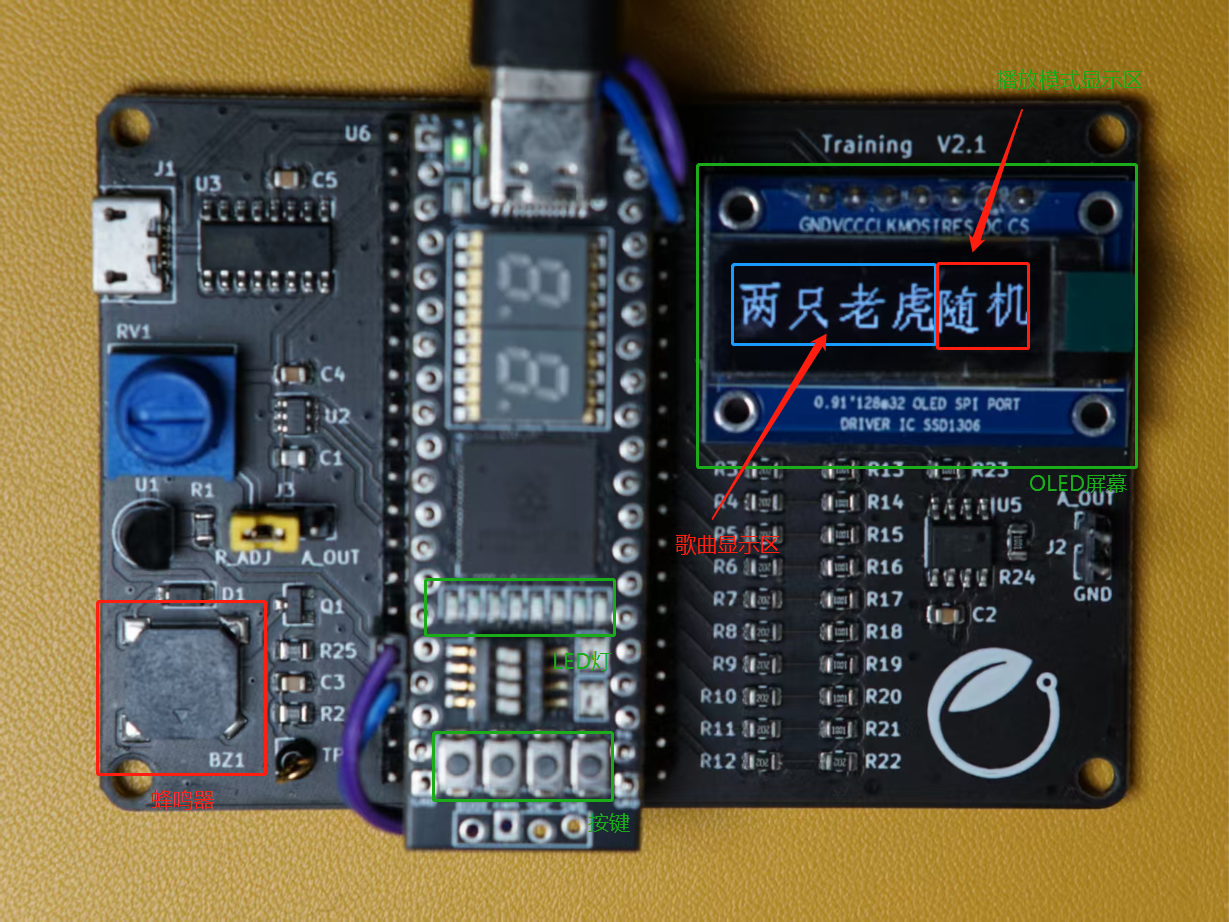
上图为音乐播放器实物图,主要使用了蜂鸣器、按键、LED灯及OLED屏幕资源,当前工作在“随机播放”模式,正在播放《两只老虎》。更多功能演示,请观看上方B站视频。
6 遇到的难题和解决方法
6.1 OLED屏幕显示异常
花屏、欢迎信息和后面歌曲名重叠,原因是没有删除之前的显示对象;
不显示“暂停状态”:制作字库时,遗漏“暂停”字符;
6.2 LED微弱点亮
点亮某LED时,其余的一个LED灯微微点亮。Charlieplexing结构要求控制LED时,GPIO电平需要为 高、低和高阻,这是三个不同的状态。在circuitpython中,将GPIO设置为输入,可以切换到高阻态。
6.3 单击 双击 误识别
原本程序中只有双击检测窗口,缺乏去抖动操作,仅靠平滑滤波无法可靠识别。增加去抖动后识别成功率明显提升。
7 心得体会
多思考,总能找到解决问题的办法。
参考资料
基于Charlieplexing(查理复用算法)实现4个GPIO控制12个LED灯 - Arduino专区 - 一板网电子技术论坛
【得捷电子Follow me第2期】+基于CircuitPython的中文显示 - DigiKey得捷技术专区 - 电子工程世界-论坛

